Athenian 2021–22 Winter After-School Computer Science Class
Fun with Electronics and Coding, with Dave Briccetti
Short link to this page: bit.ly/db-tas-6
Go to the latest lesson.
In this class, for beginning and experienced programmers and “digital makers”, you’ll create several fun projects combining coding with wiring up buttons, sensors and motors, while strengthening your programming skills, and being exposed to the big ideas of computer science.
Hardware
We’ll work with several tiny computers and microcontrollers.
The Raspberry Pi is a full-featured, but small, computer.
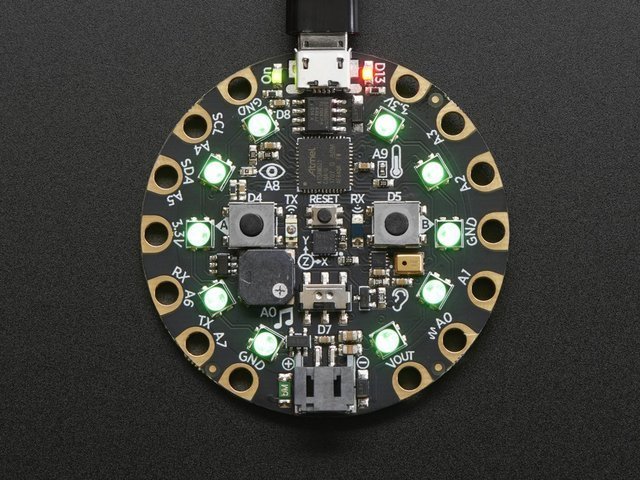
The Circuit Playground Express is less powerful than the Raspberry Pi, but includes many sensors and lights, and consumes less power.
The Arduino is a very popular microcontroller, with a large community creating software for it.
Software
- Python is one of the most popular programming languages, and it’s suitable for beginning programmers as well as professionals.
- JavaScript/TypeScript is another of the most popular programming languages.
- C++ is used for programming Arduinos.
- MakeCode for Circuit Playground Express makes it easy to program the CPX using blocks.
- Tinkercad Circuits lets you try out your electronics circuits in a simulator before assembling them with real components.
Projects
The best projects might be the ones students come up with themselves, but here are some ideas:
Multiplayer Reaction/Memory Lights Game
Inspired by Simon game
Features:
- Raspberry Pi tiny computer
- Python and TypeScript (a better JavaScript) programming languages
- making a web application (webapp) with the Flask framework
- Hypertext Markup Language (HTML) and Cascading Style Sheets (CSS)
- electronics fundamentals
- connecting components on a breadboard
- reading button presses
- lighting multicolor LEDs
Smart Thermostat
Make a smart thermostat to control your home temperature.
Dave’s YouTube Electronics Playlist should provide more ideas.
The Teacher
Dave Briccetti is a highly skilled programmer and experienced computer science teacher. Watch him teach on his YouTube channel.
Have a look at Dave’s Fall, 2021, class, Programming an Adventure Game… to get a feel for what Dave’s classes are like.
Bring to Class
Bring your own laptop computer running macOS, Windows, or Linux, or use one provided by the school. The school will provide hardware to use during the class, and you’re welcome to bring your own hardware.
2022-01-25
Computing in the News
‘Fitbit for the face’ can turn any face mask into smart monitoring device
Circuit Playground Express (CPX)
Adafruit’s CPX Page introduces the CPX.
We’ll use MakeCode for CPX. Microsoft describes MakeCode as “a free online learn-to-code platform where anyone can build games, code devices, and mod Minecraft!”
Explore Tutorials and Play
Send a Program to the CPX
Hot Wheels Track Challenge
How could you use a CPX to determine when a car reaches the finish line?
2022-01-27
Computing in the News
Rooftop Drones for Autonomous Pigeon Harassment¹
¹No pigeons are harmed
Circuit Playground Express (CPX)
Different Ways to Program
- MakeCode
- Blocks
- JavaScript
- CircuitPython
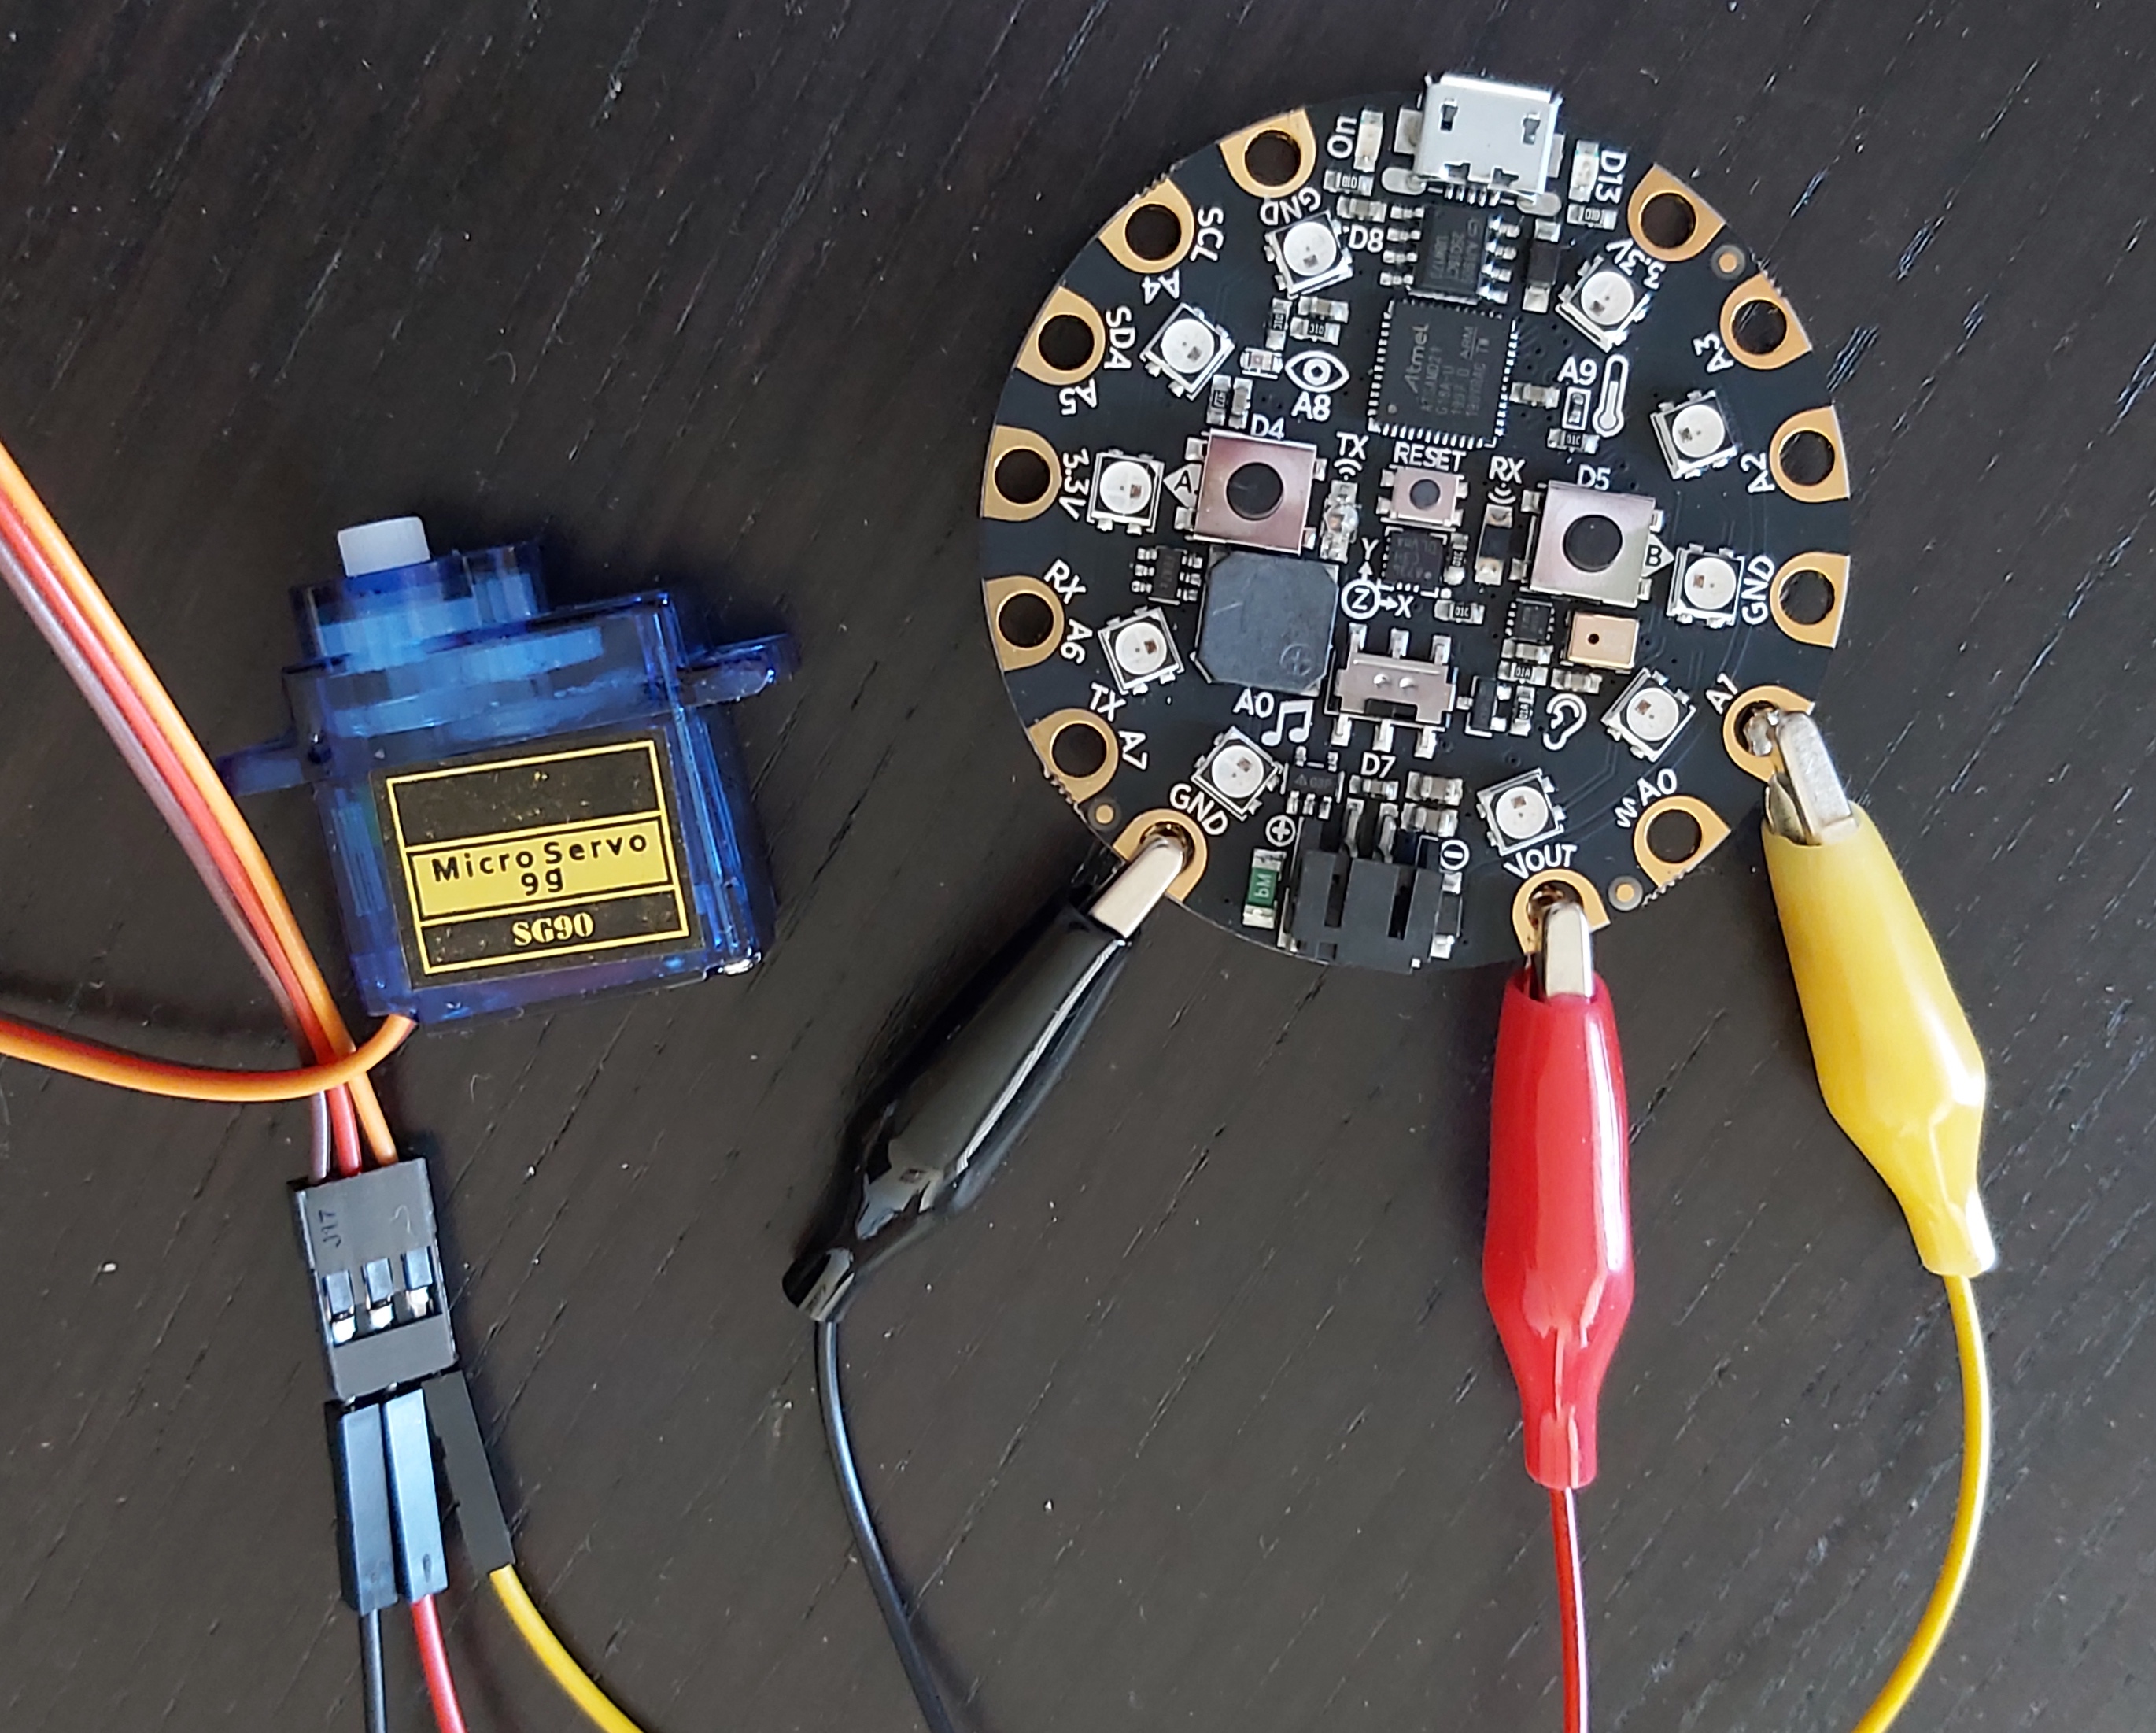
Servo Motors
Our hardware projects can sense the environment (using light, sound, pressure, acceleration, etc.) and can effect change in the environment (using motors, light, sound, etc.). Today we’ll connect servo motors to our CPXes. Here are some of Dave’s projects using CPX or Arduino and servos:
Connecting the Servo
Make connections as shown here:
Make Something with the CPX and the Servo
Here’s what Dave made (MakeCode project):
What will you make?
2022-02-01
Computing in the News
Maker and BJC Curriculum Developer Deanna Gelosi
Review
So far we’ve programmed the Circuit Playground Express (CPX) to do various things, including controlling a servo motor.
Thanks to BJC
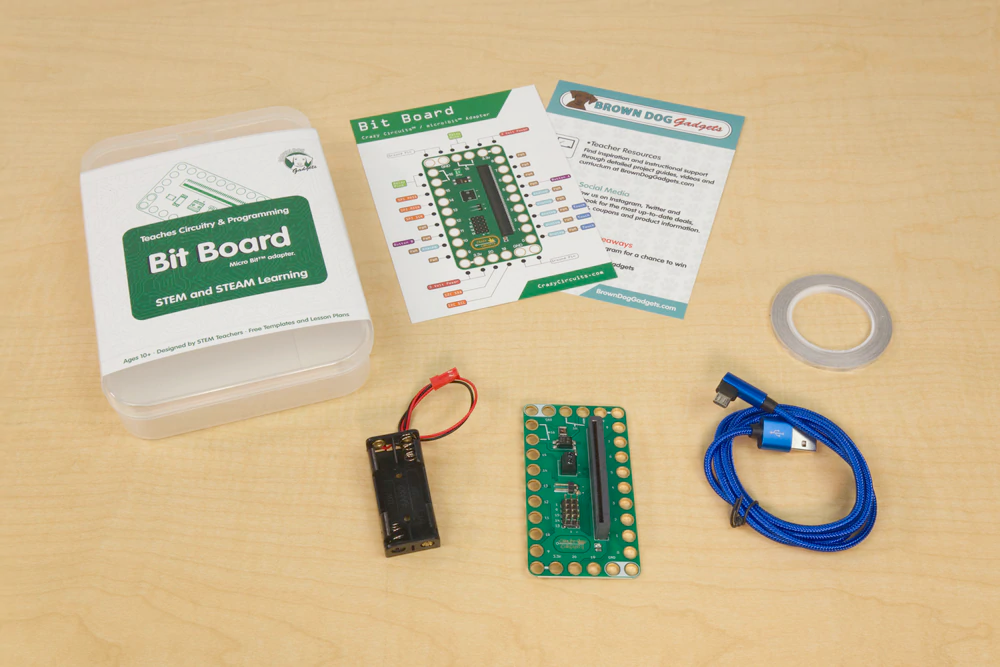
The micro:bits, breakout boards, and batteries are provided by The Beauty and Joy of Computing.
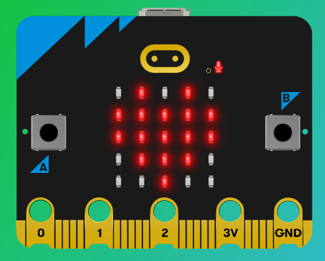
micro:bit
Today we’ll start using the micro:bit. They have a lot in common with the CPX, including:
- LEDs
- sound
- sensors (light, heat, acceleration, etc.)
- motor control ability
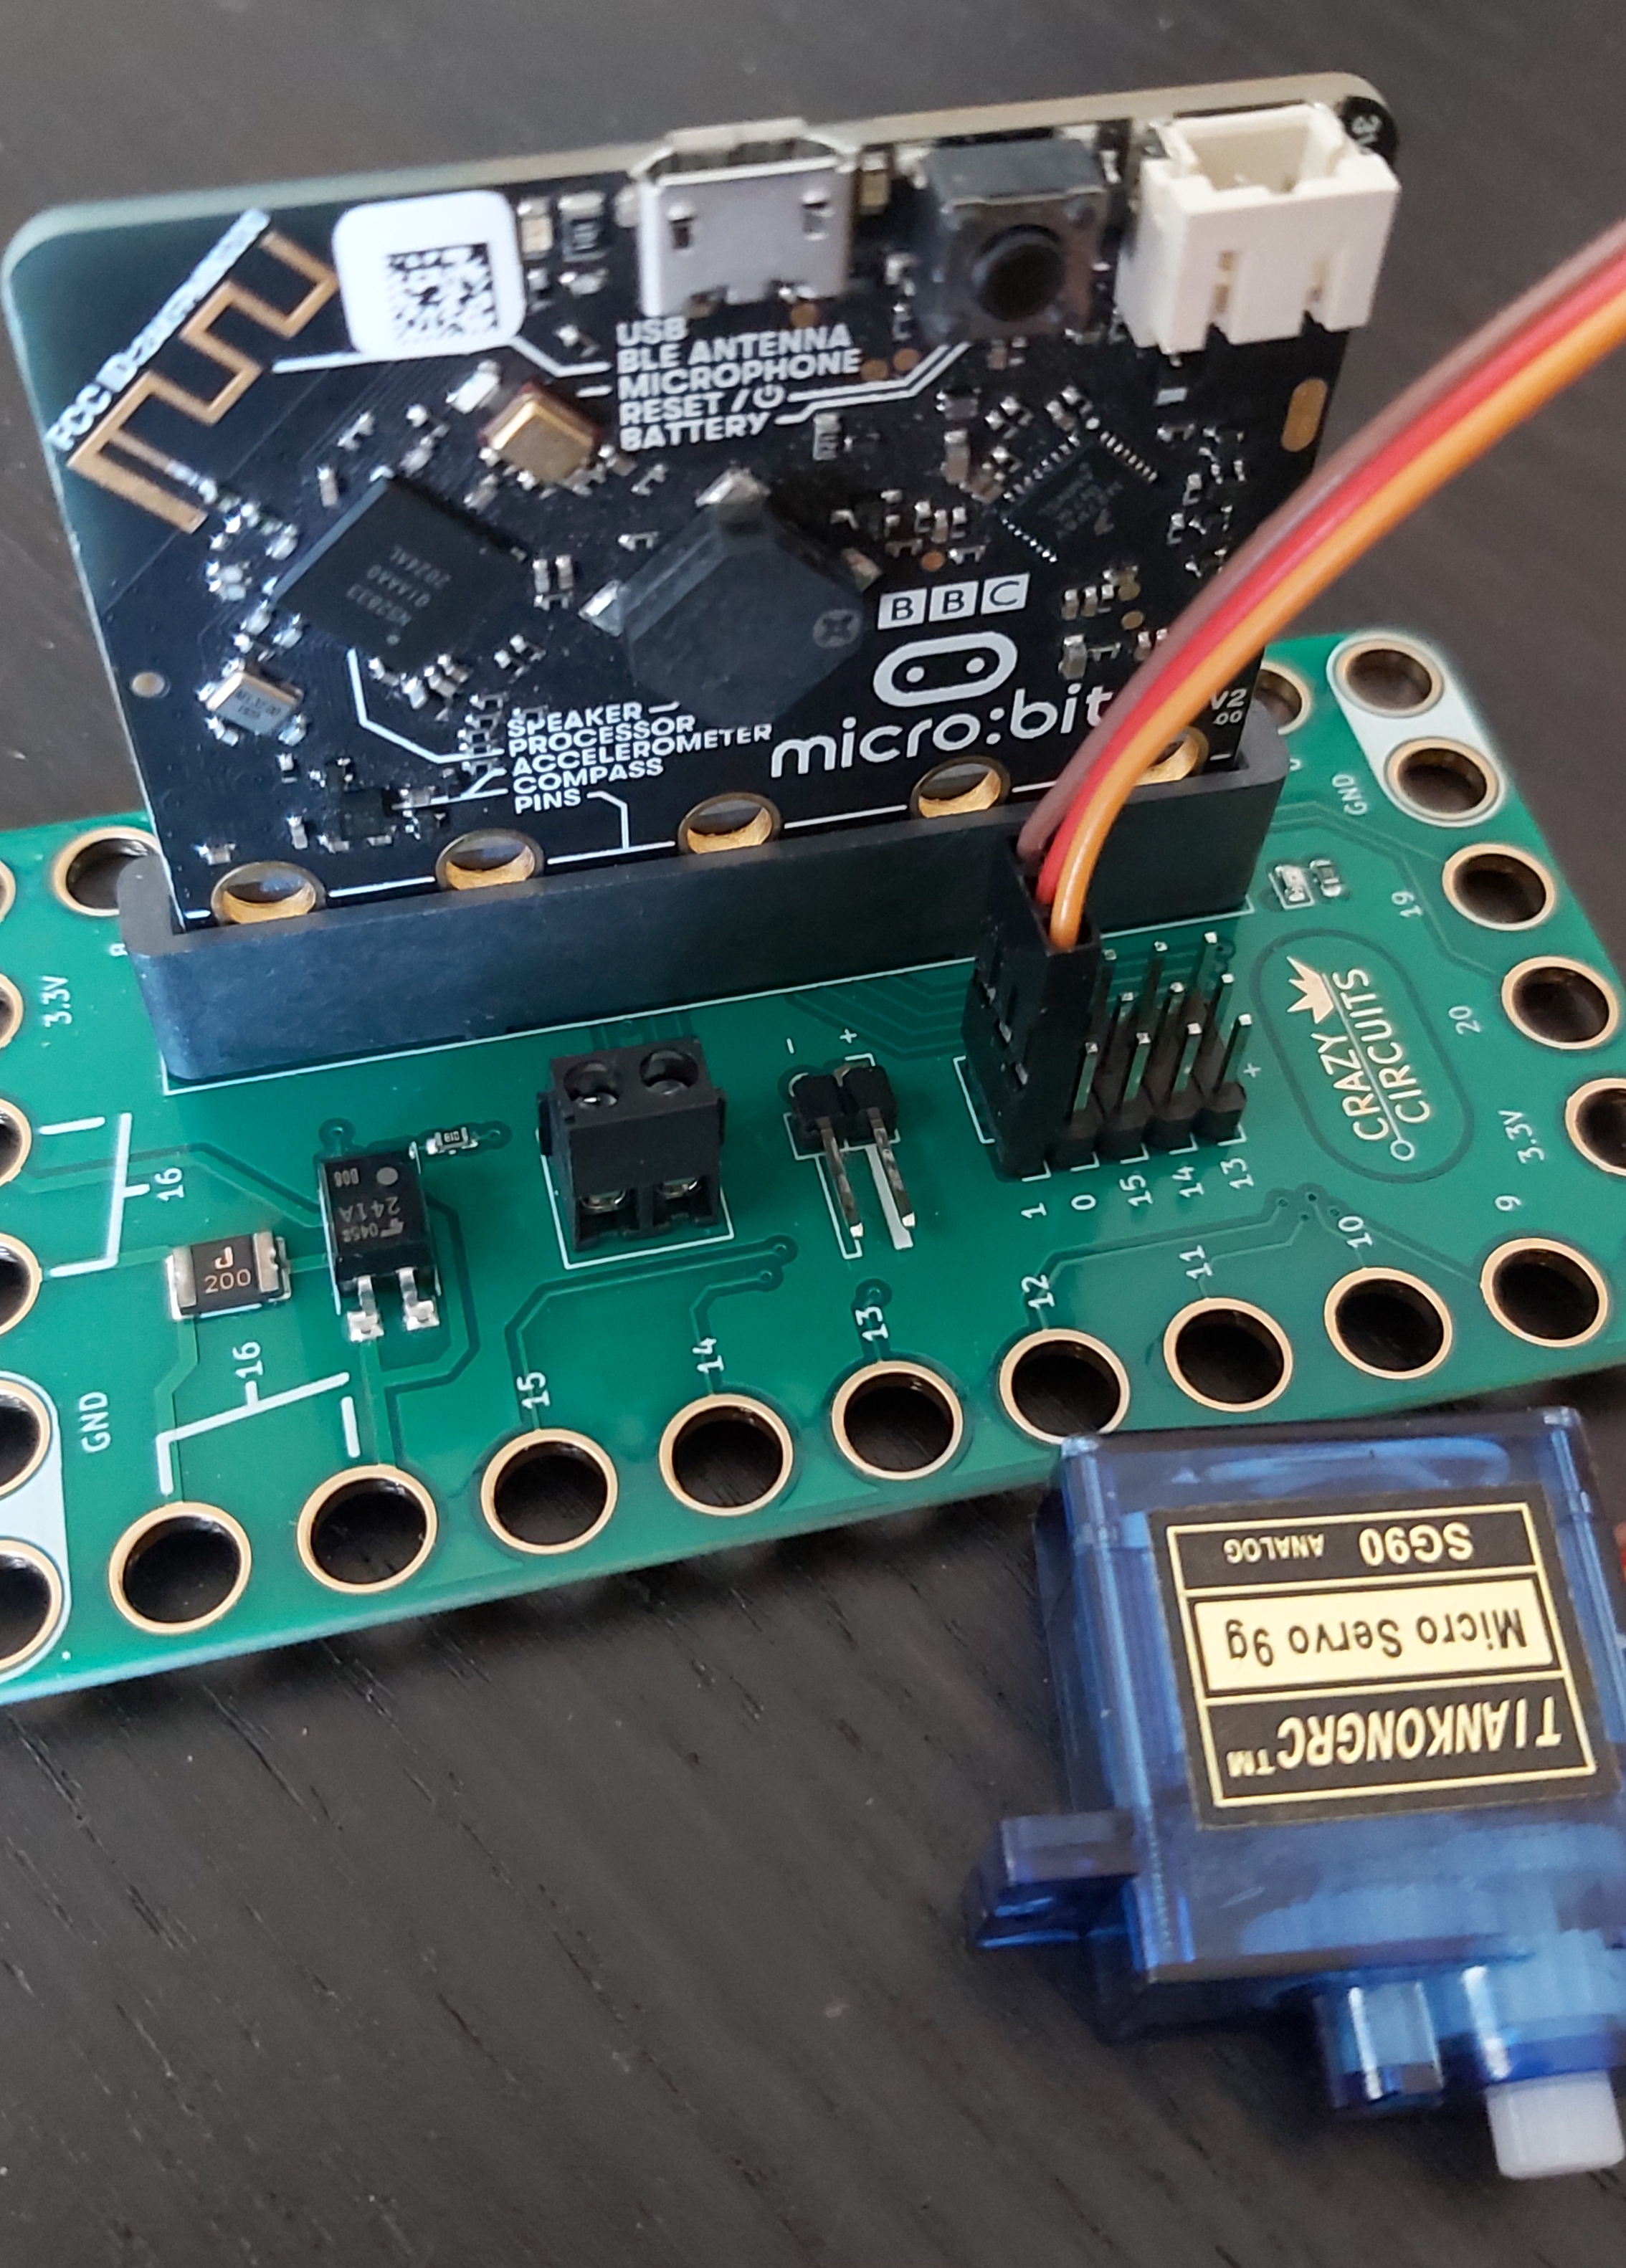
Breakout Boards
A breakout board makes it easier to connect a device such as the micro:bit to other components. It is easier to connect a servo motor to the micro:bit because the breakout board has headers, pins that connect directly to the servo’s female connectors.
Trying Out the micro:bit
Use the USB cable in the kit to connect the micro:bit to your computer. Be gentle. The micro:bit should power up and then engage you for a few minutes in an interesting way that shows some of its features.
Connect to the Breakout Board
Gently insert the micro:bit into the connector on the breakout board.
Connect the Servo
Make a Program
As before with the CPX, we’ll use MakeCode, but a different version of it for micro:bit.
Here’s Dave’s example.
Download Directly to the micro:bit (No Drag and Drop Needed)
This requires Chrome or Edge. Click on the gear icon and choose Connect device. Once connected, push Download and that’s all that’s needed.
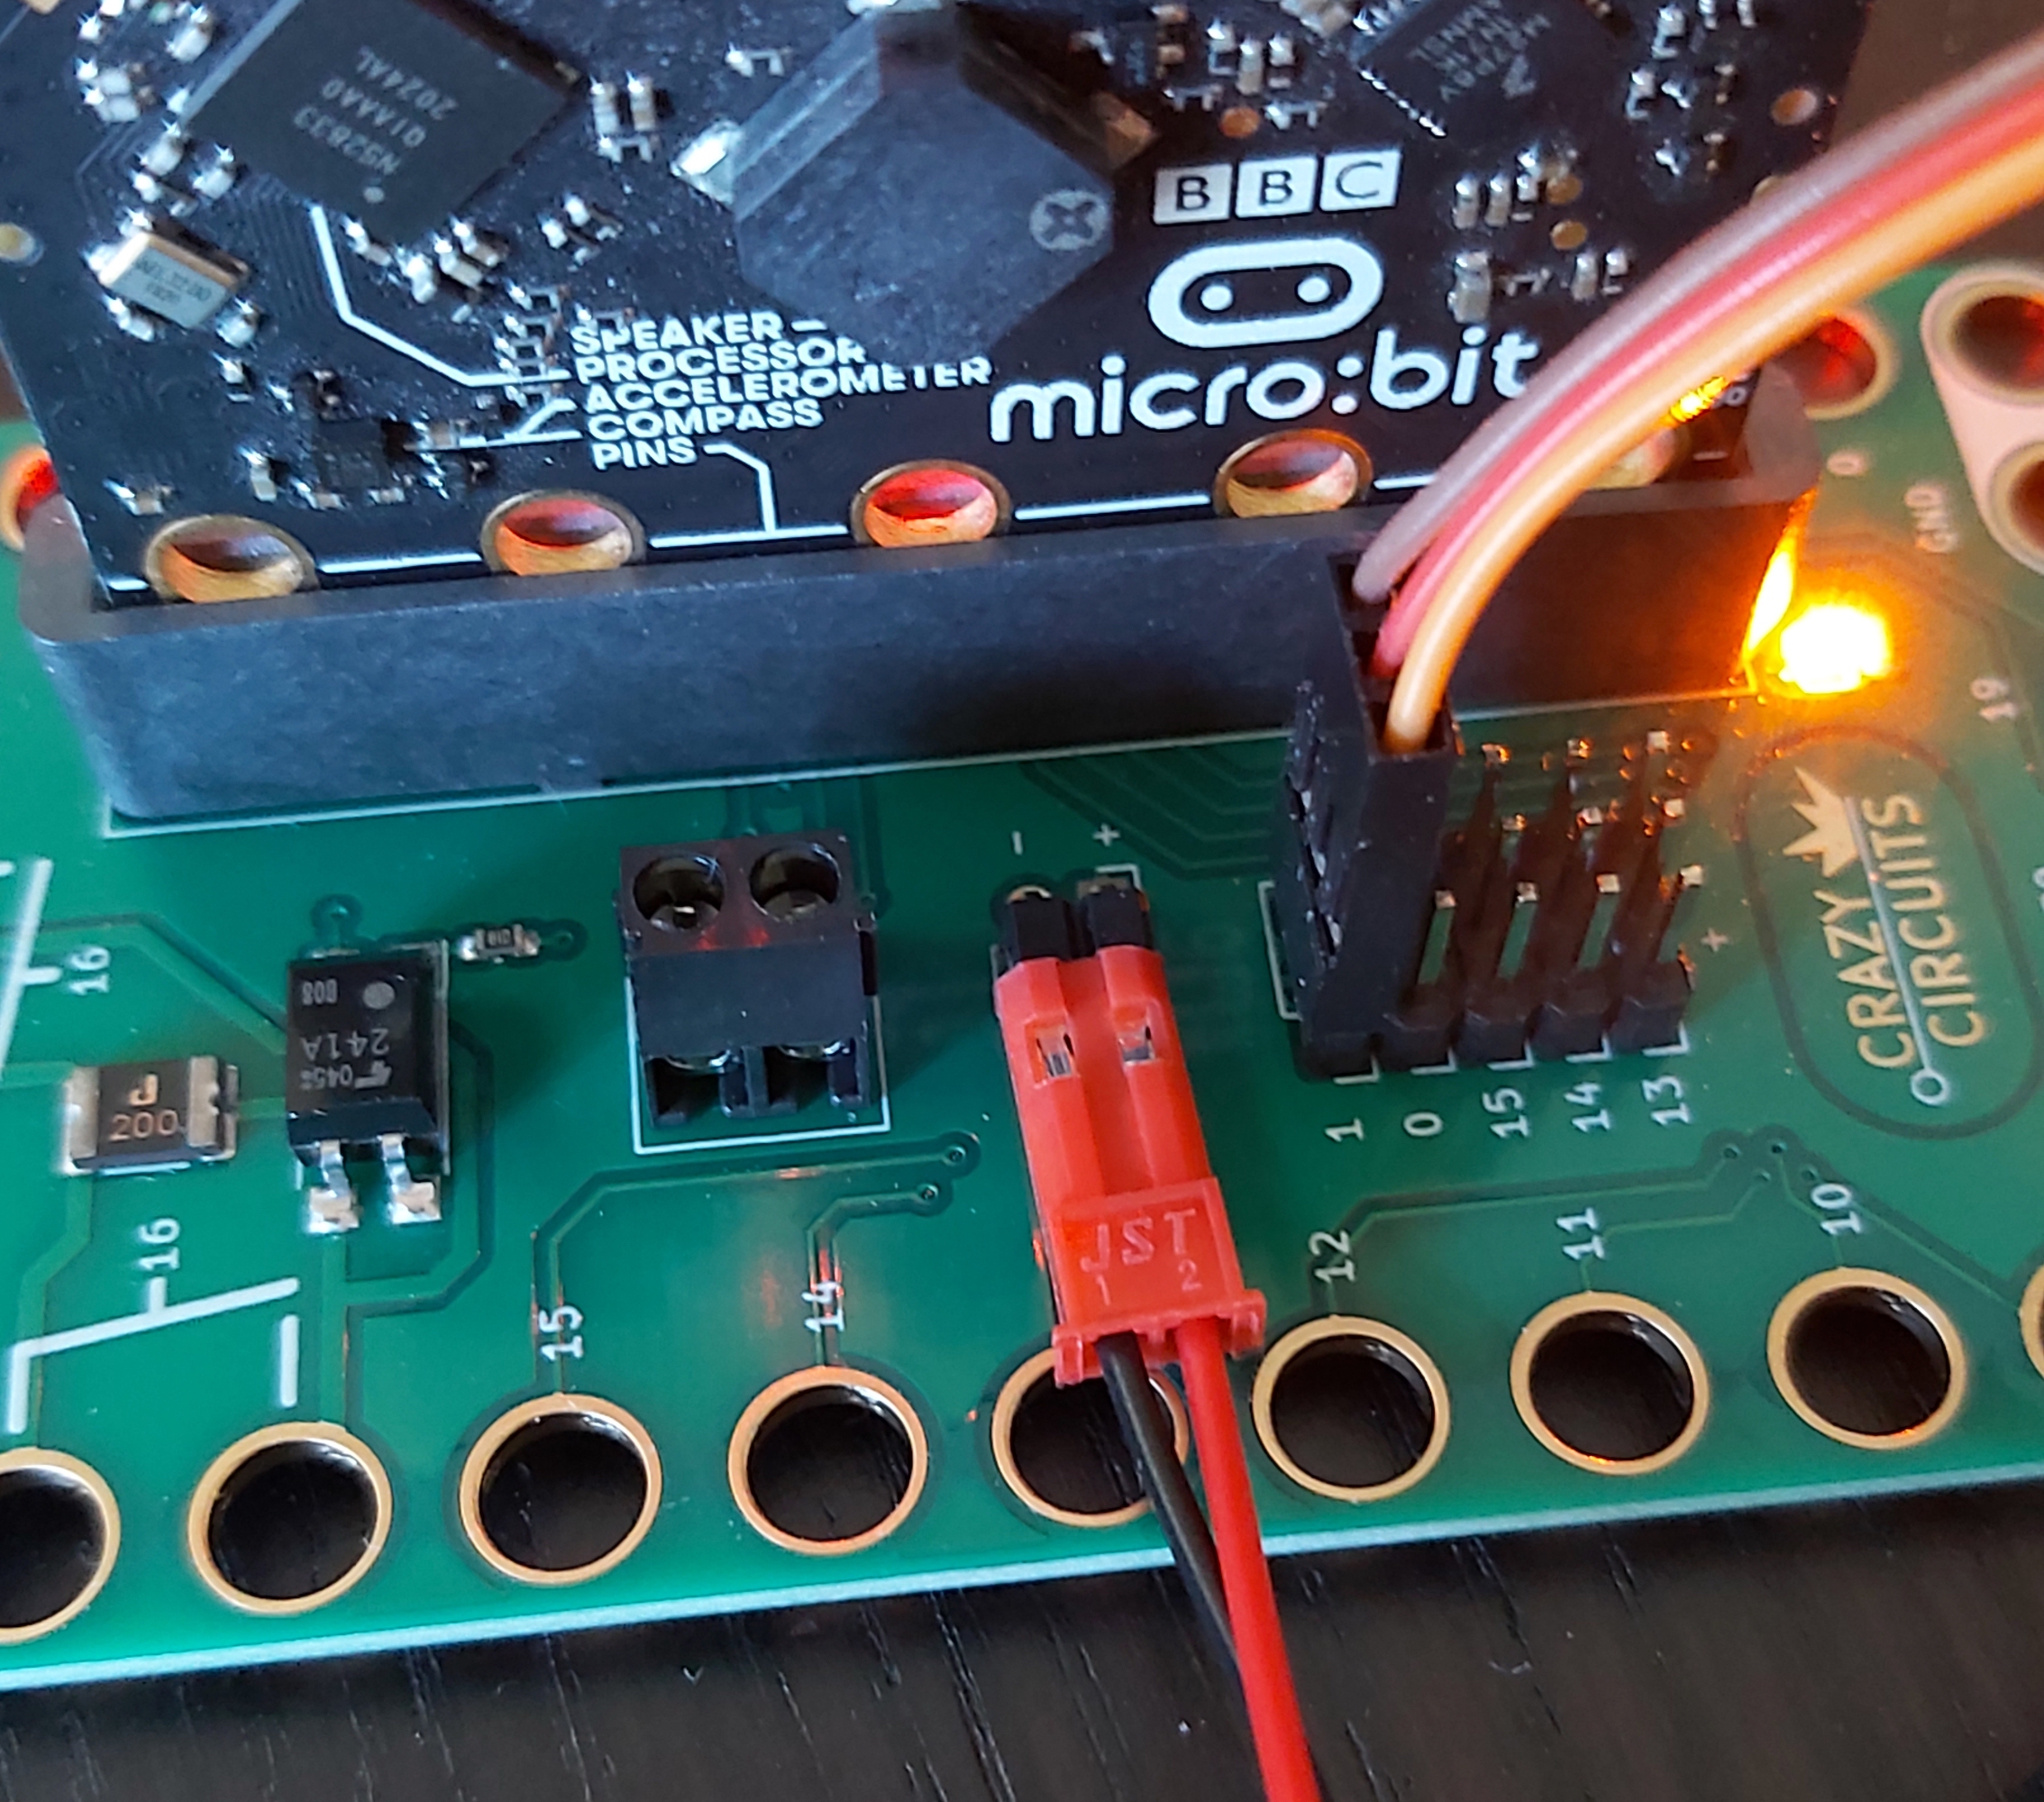
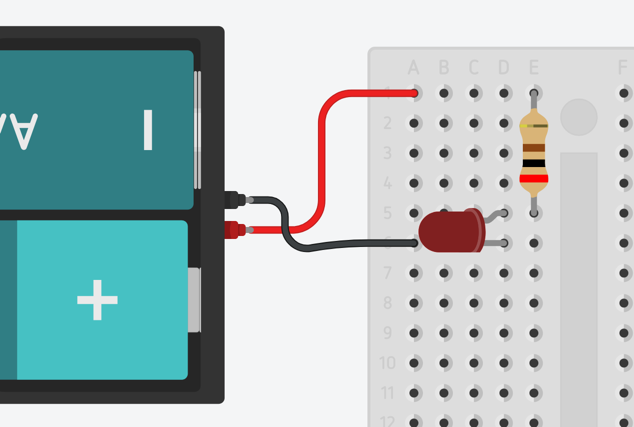
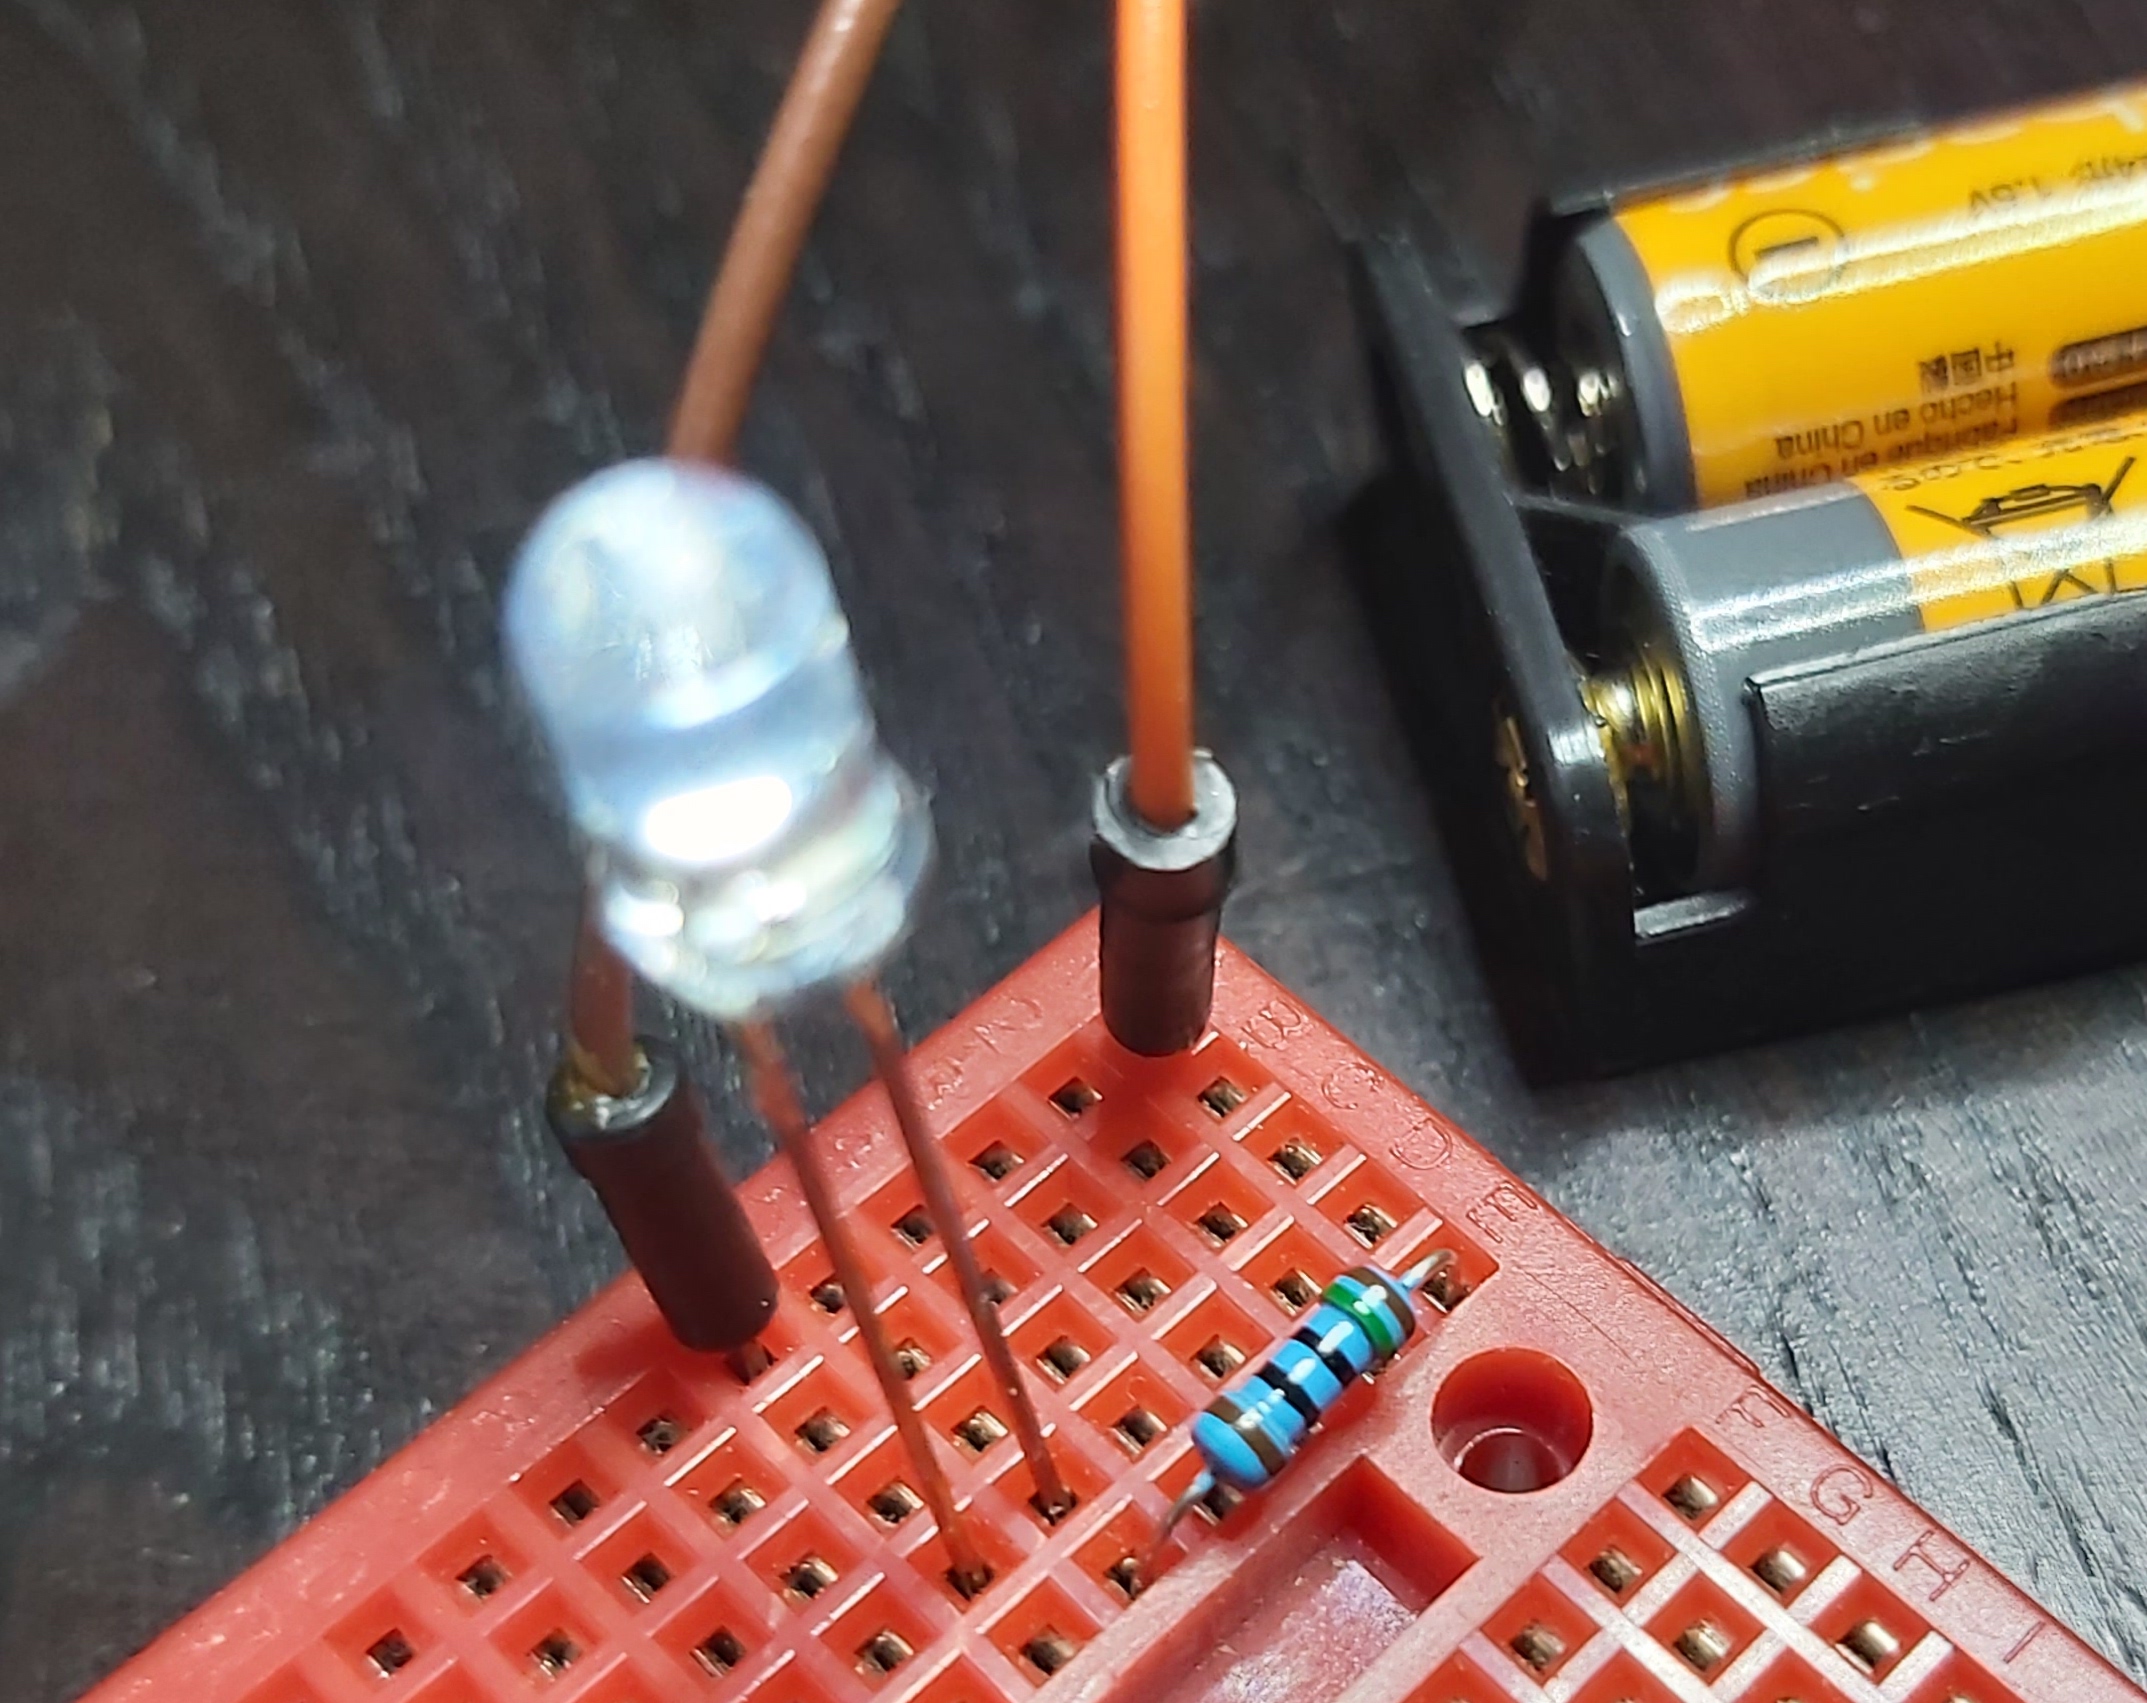
Battery Pack
You can disconnect the micro:bit from the computer once you have it programmed, and instead power it from a battery pack. Connect the battery pack as shown here (red to +, black to -). When disconnecting, don’t pull the wires. Pull on the plastic piece instead.
Play Time
Play with the servo, the LEDs, sound, the accelerometer, whatever you like! Make something.
Radio Communication
This is one of Dave’s favorite features. These devices can communicate with each other using radio transmissions. If we have time we’ll play with it.
Observations
Students connected the components with very little trouble. They spent lots of time trying out the LED, sound, accelerometer and other functions. One student made a game using buttons to move a pixel around on the display. Another expressed interest in the radio, and it spread from there with at least half the class trying the features.
Two pairs of students took the micro:bits outside in order to estimate the range of the radio transmissions. One group arrived at 57 meters. I’ve since learned you can control the signal strength with a MakeCode block, and the default value is a bit lower than the maximum.
I didn’t see anyone use a servo motor.
2022-02-03
Computing in the News
Athenian FIRST Robotics Team Prepares for Competition.
Tour of Athenian FIRST Robotics Development Efforts
Correction
MakeCode for CPX (running on Chrome or Edge) supports downloading directly to the CPX, as does MakeCode for micro:bit.
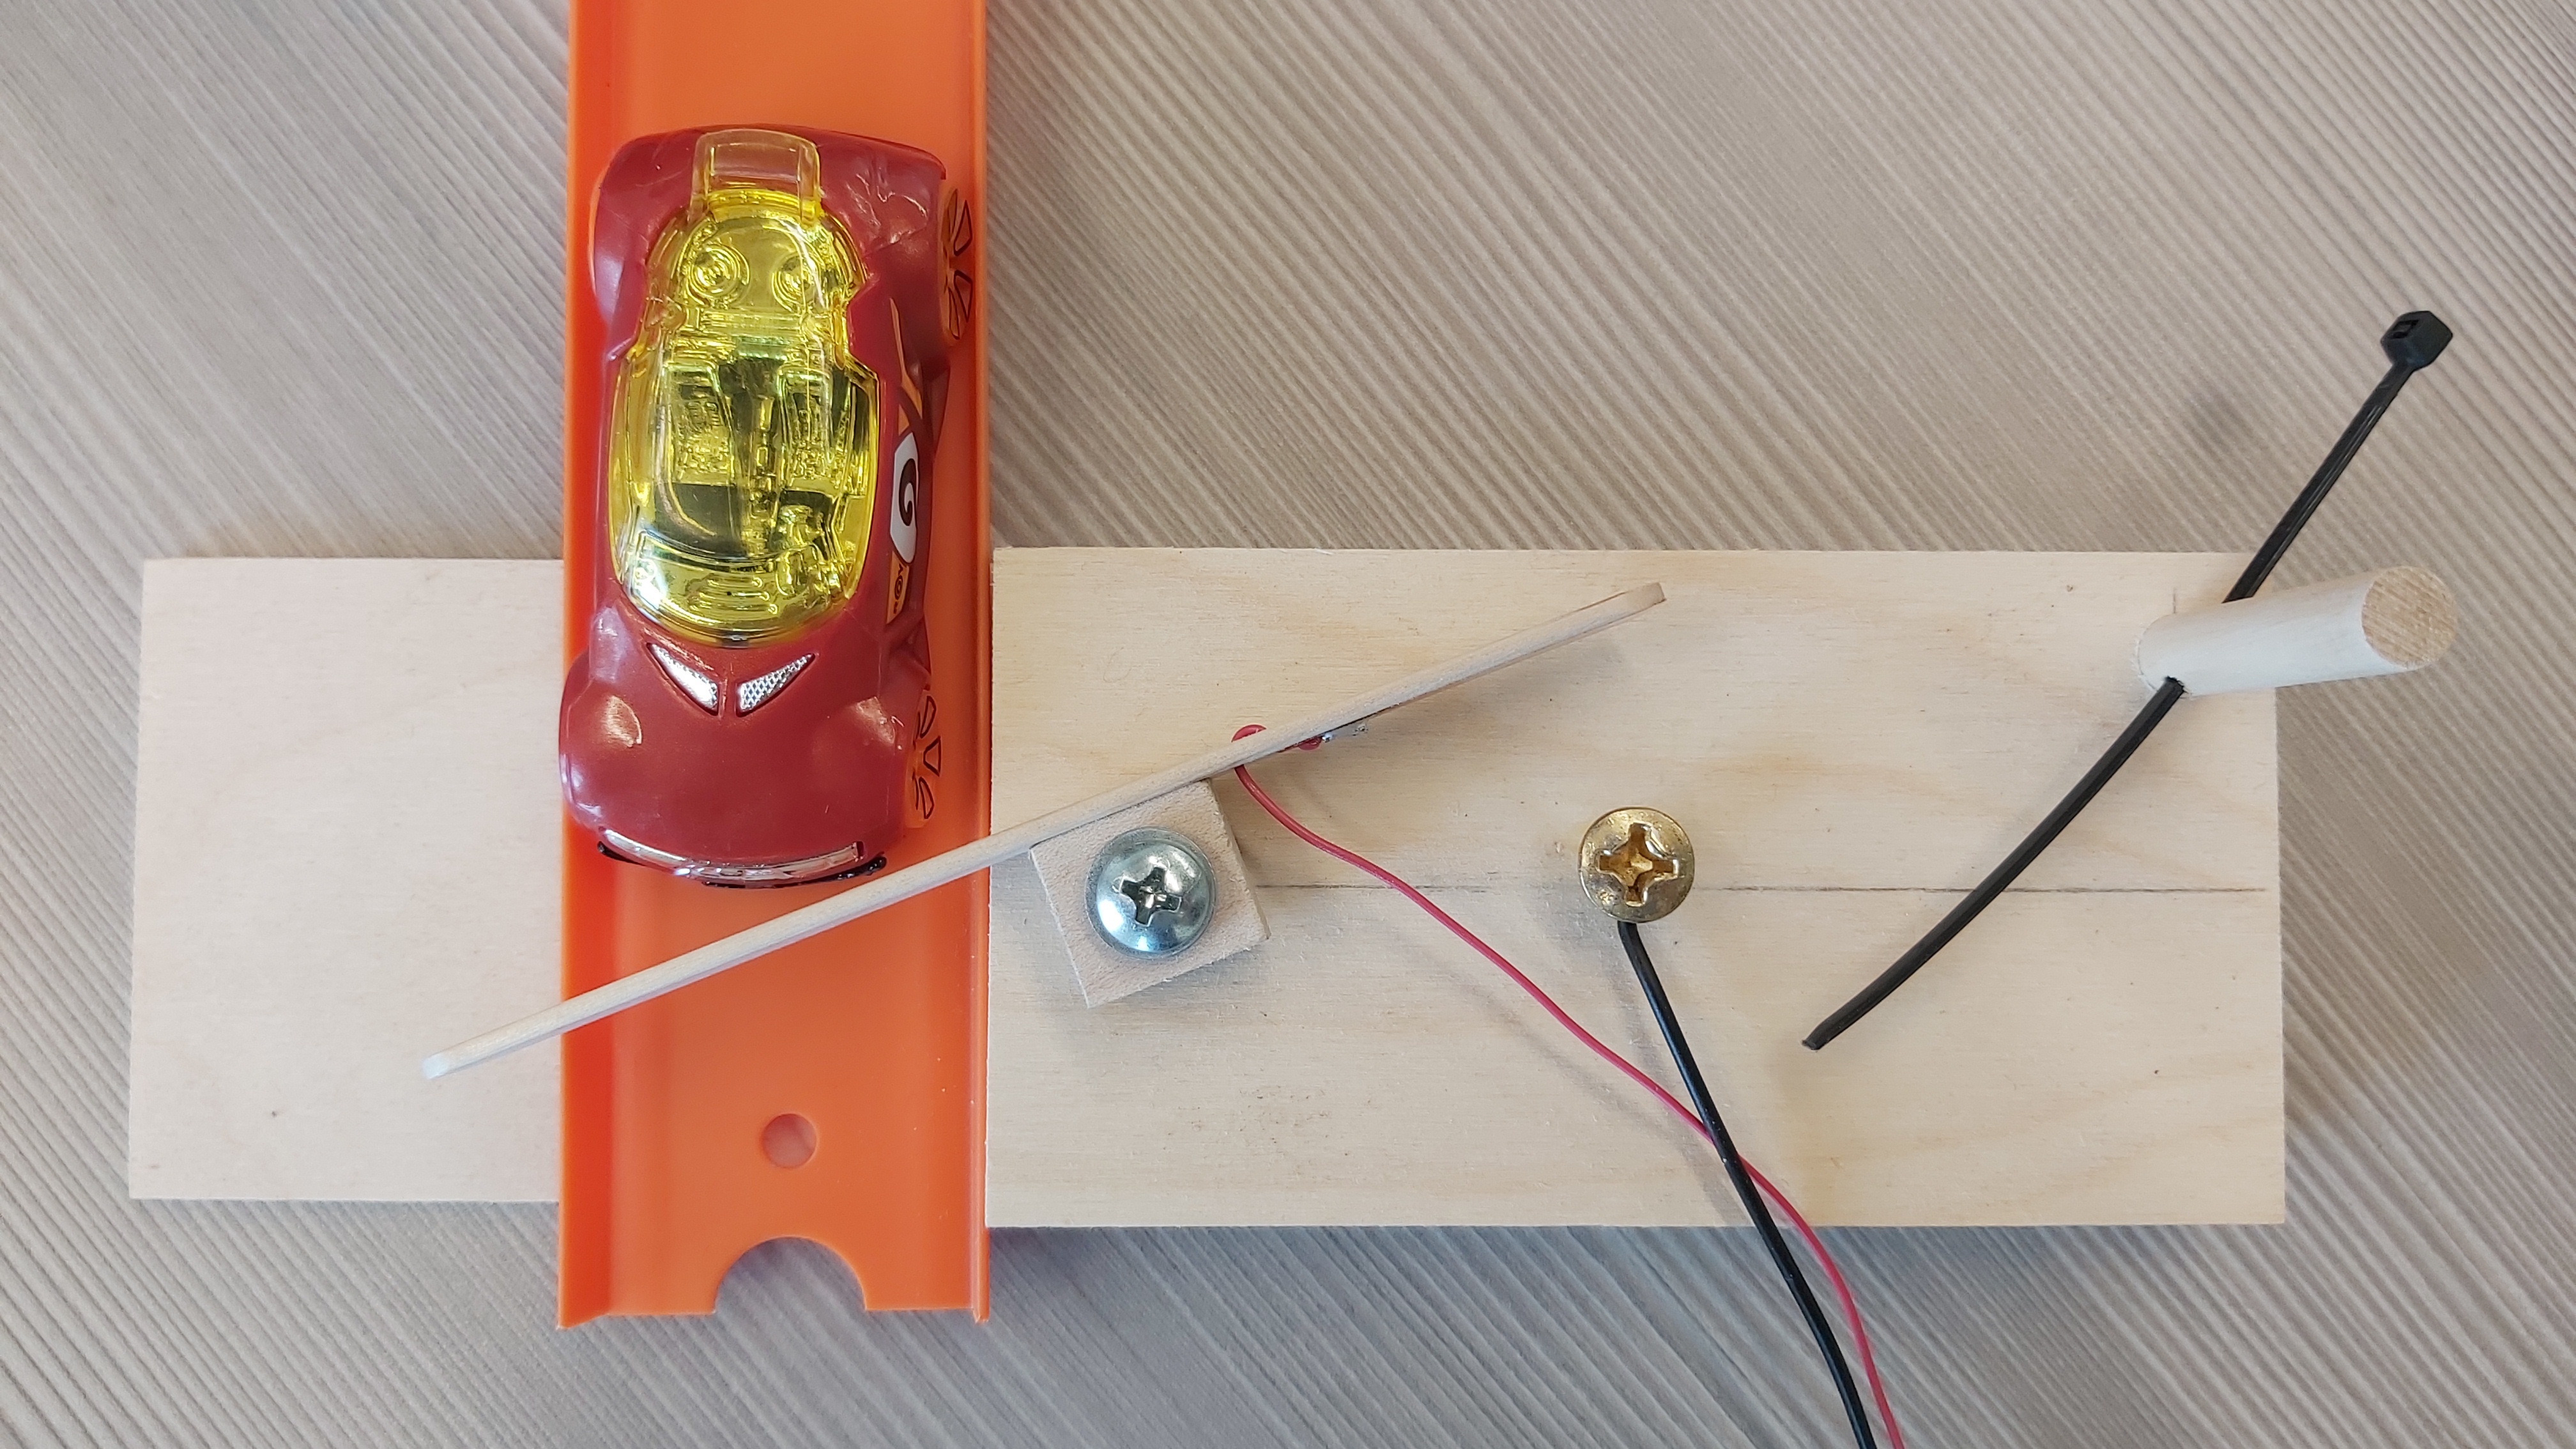
Hot Wheels Track Progress
MakeCode Programs
The Car-Detection Circuit
Challenges
Can you modify the Coordinator such that it times the car and displays the elapsed time when the car reaches the finish line?
More with micro:bit
Communicating by Radio
Ideas:
- make a “repeater chain” to extend the range of transmissions. How far can it reach?
- Using several micro:bits, have a “composer” tell the other micro:bits what notes to play. Can you play chords and melodies?
Using Servo Motors
Ideas:
- think synchronized swimming
Observations
We had a tour of Athenian’s FIRST Robotics team’s work areas. Several students asked interesting questions, resulting in lots of interaction between the team members and the class.
In the remaining 25 minutes or so, students accomplished a lot:
- Respond to shake
- (Two students) multiple channel radio broadcast
- Hello in different languages
- Servo motor
- Remote-controlled game with buttons
- Rock, paper, scissors
- Music, rock, paper, scissors
- Scrolling text
- Rock, paper, scissors
2022-02-08
Computing in the News
Swedish Father and Son Create Bird Feeder that Teaches Wild Magpies to Pick Up Litter
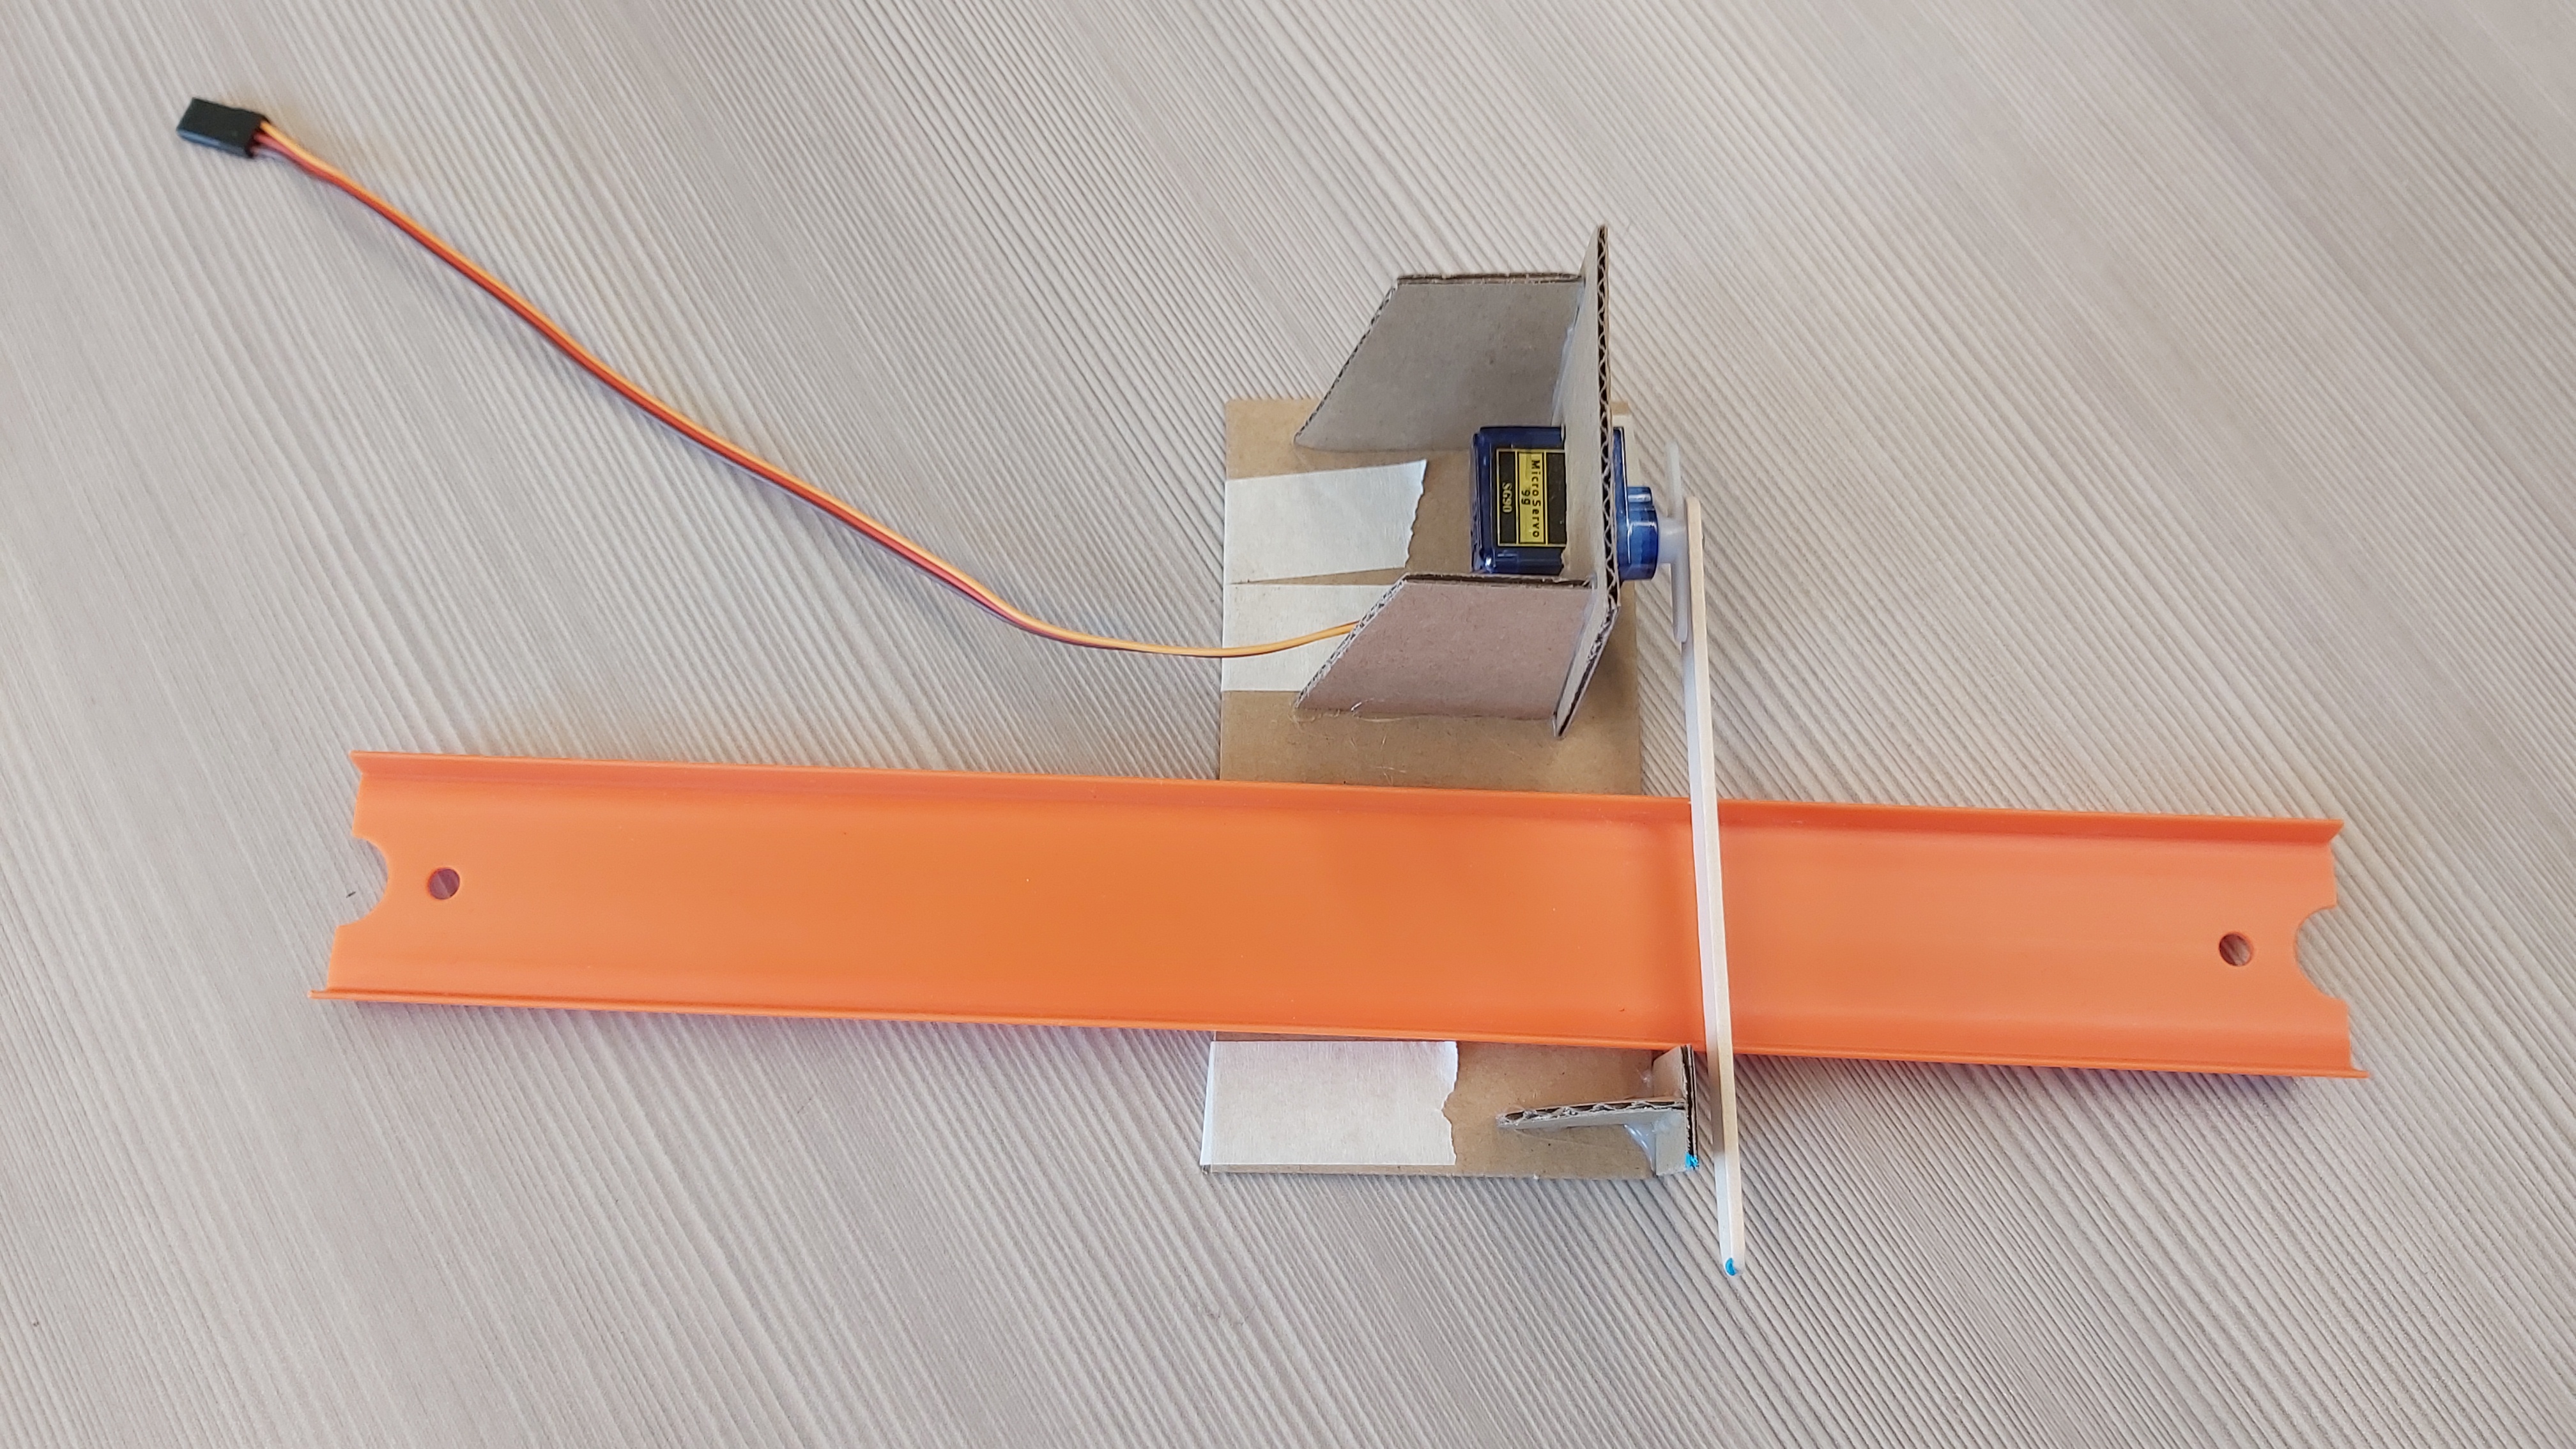
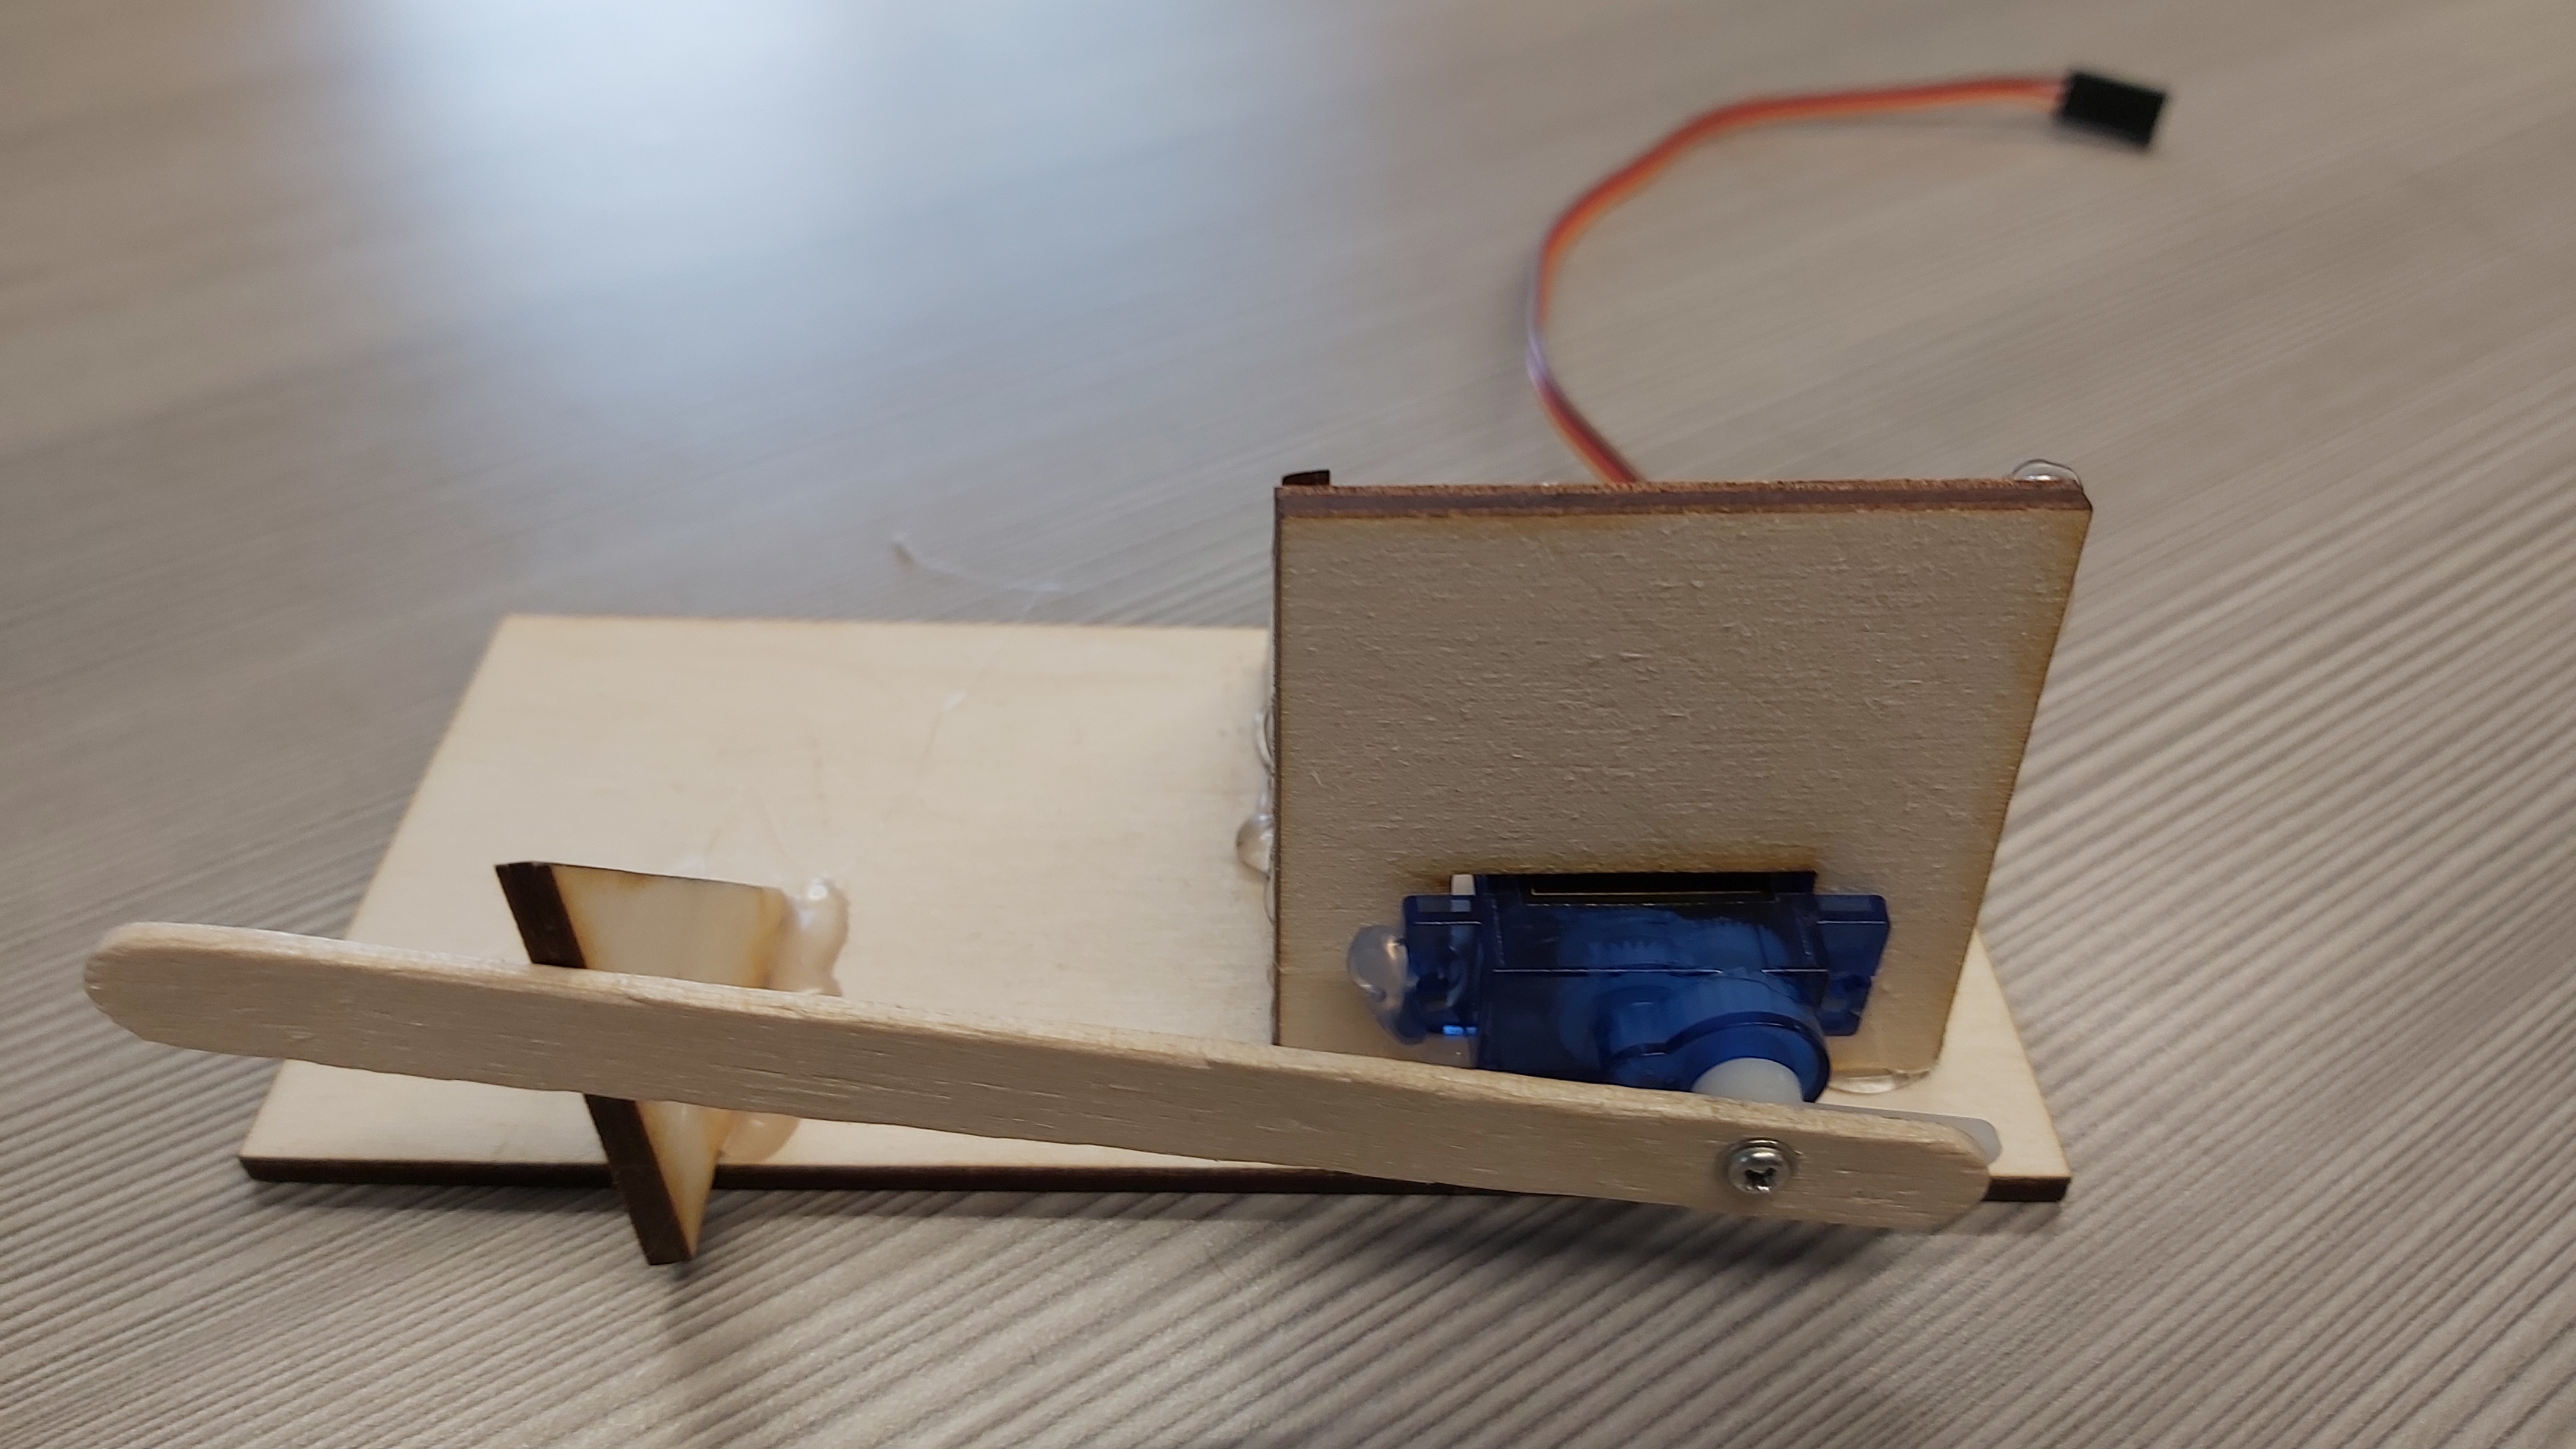
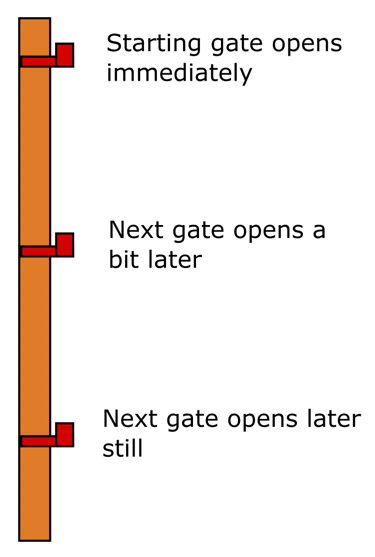
Improved Starting Gate
Mike Meneghetti designed and built a better starting gate using cardboard, hot glue, a craft stick screwed into the servo’s horn, and a bit of adhesive putty.
Different Finish Line
Mike built this as well. It works where the optical solution doesn’t—when
the car is moving really fast.
Slow Motion Car Start and Finish
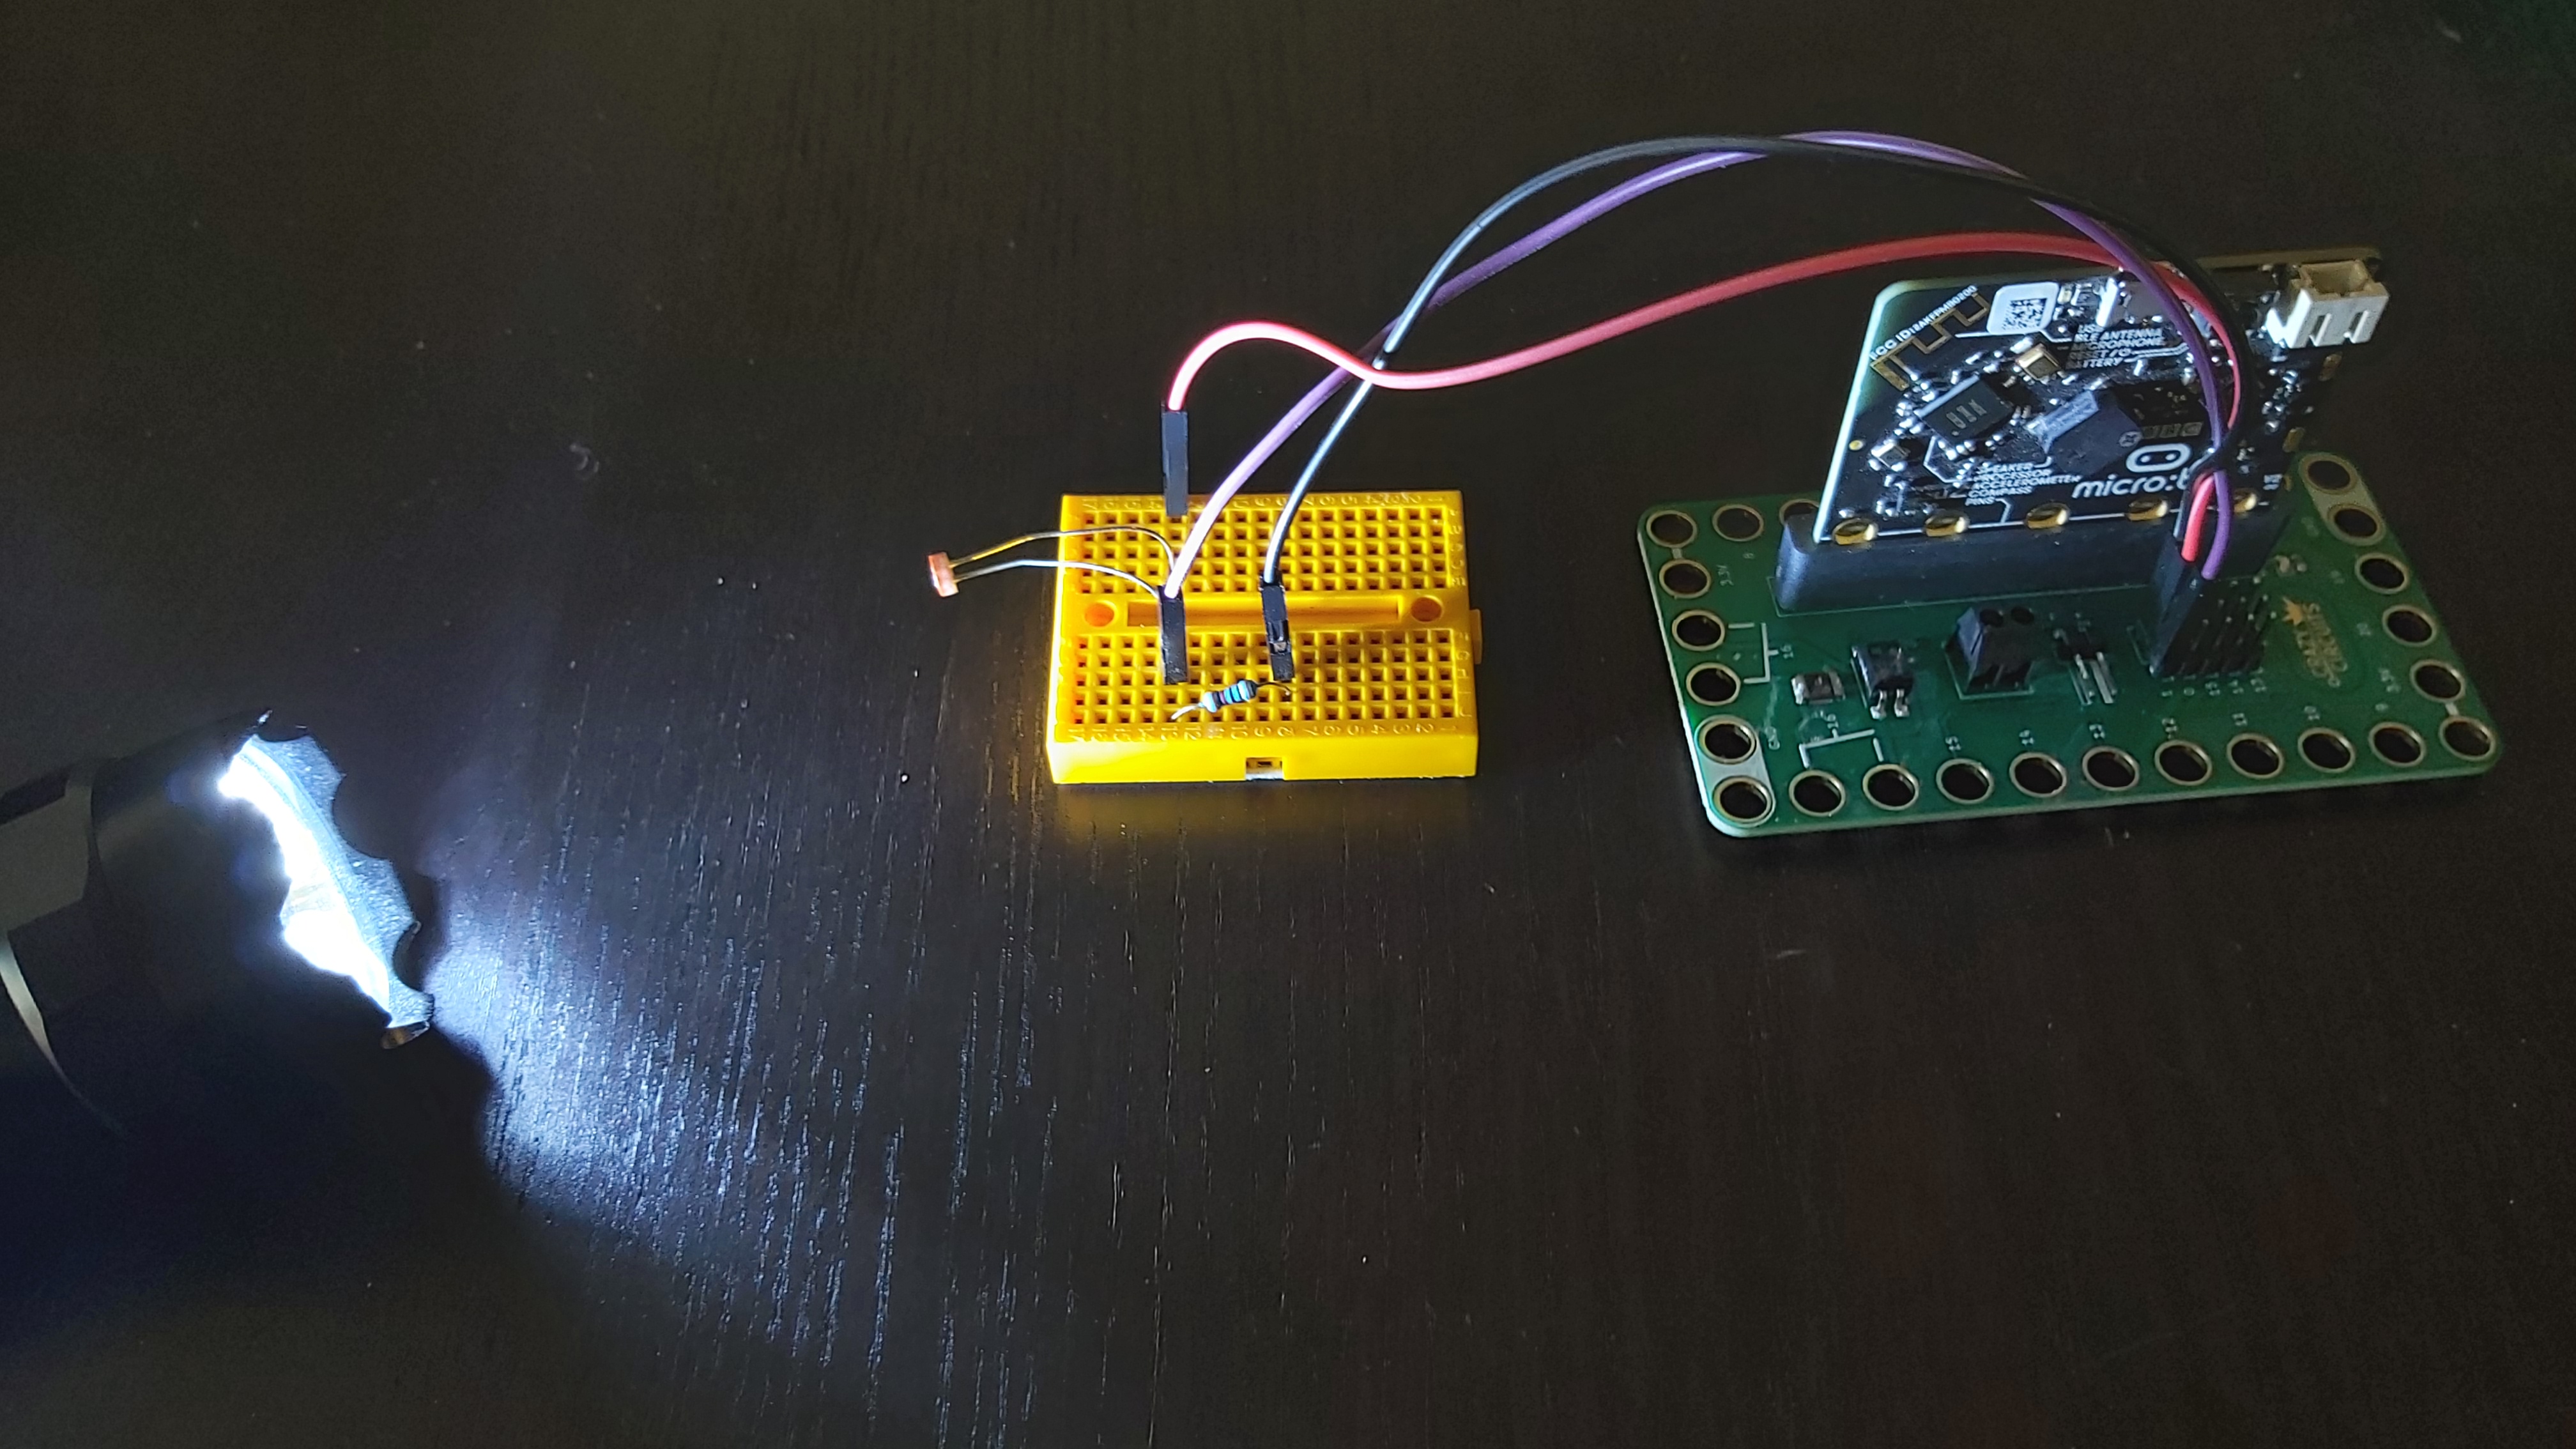
Light Meter Project
We’ll make light meters using light level and a servo motor.
Mapping One Range to Another
light level yields a number from 0 to 255. We want to use that range of numbers to set the angle of a servo motor (0–180). What sort of divisions and/or multiplications must we do to change light levels to angles?
Other Activities
What are you interested in trying? Combining radio and servo functions?
Observations
Most students did the light meter project, but for a few, we couldn’t get the servos to move. Dave checked the wiring, the code, and that the micro:bits were paired and the code was downloaded.
One student, using a tutorial, connected a banana and an orange
to the micro:bit and played tones by touching it. Another made
a program to monitor multiple radio channels. Two students continued
work on their drawing program. One used the if block to show
different icons depending on the light level.
2022-02-10
Computing in the News
Steve Wozniak Phreaks Out On The History Of Hacking
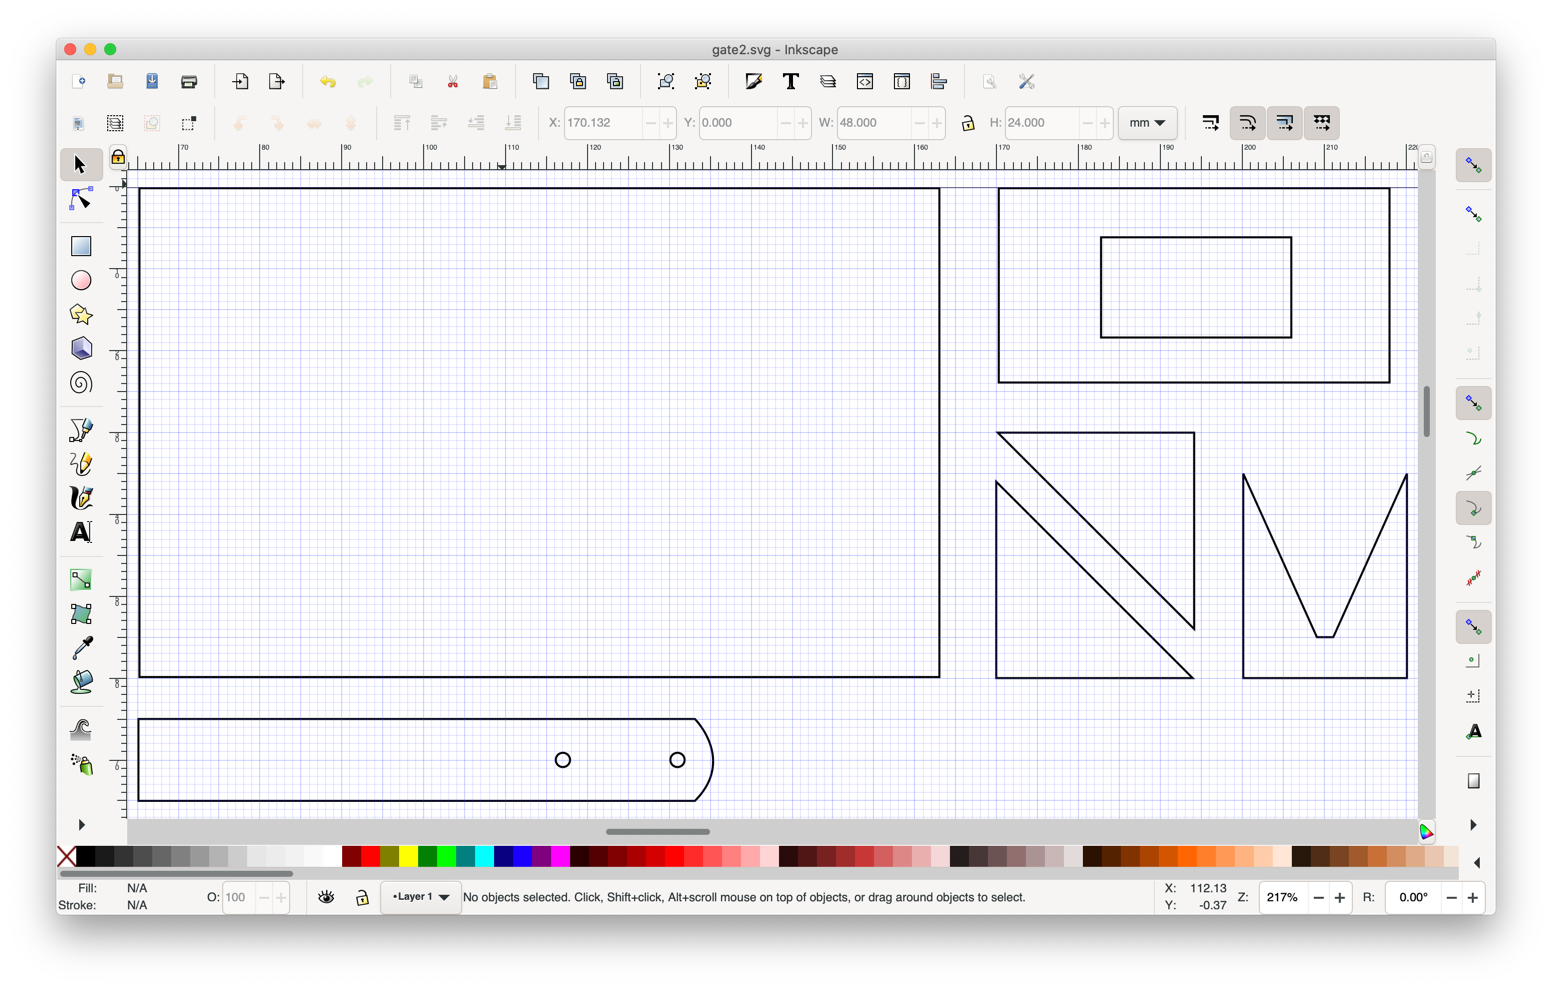
Laser Cutting
Using InkScape to define what is to be cut:
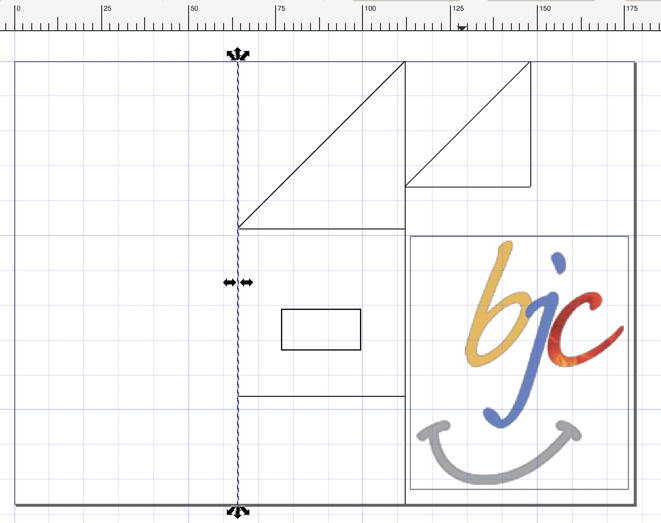
The finished cut wood:
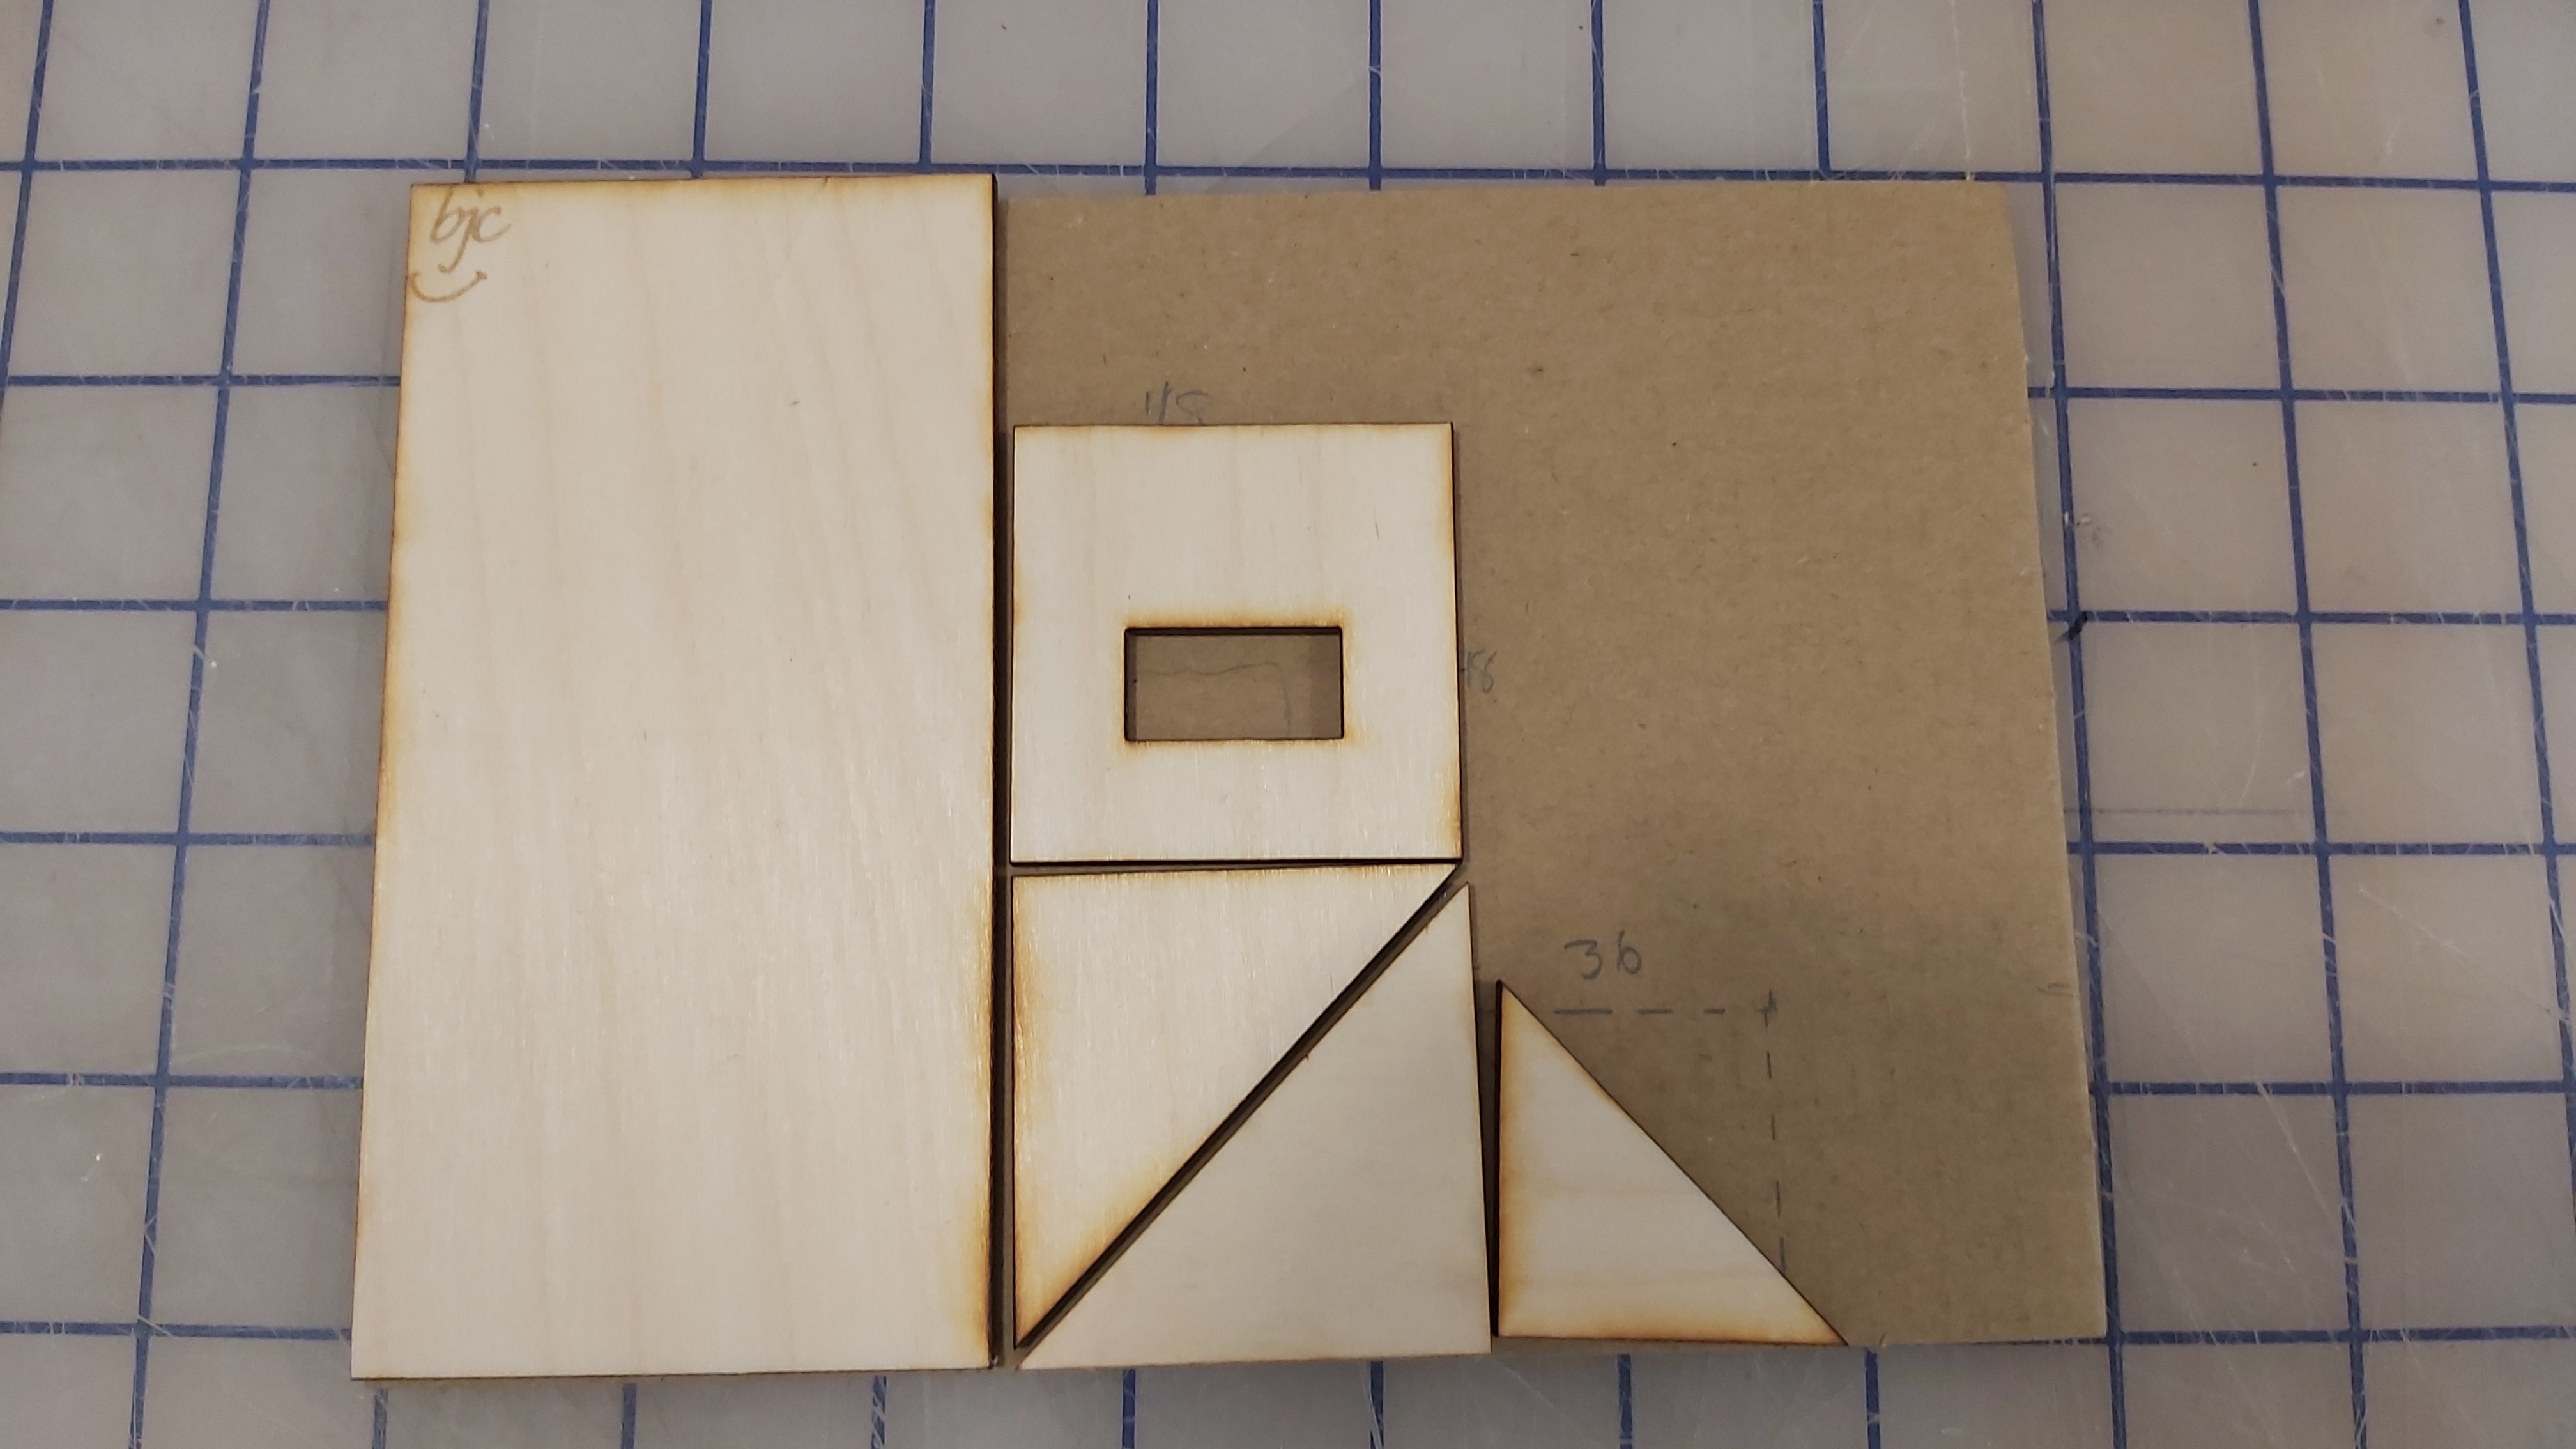
Shall we assemble it?
Programming the micro:bit in Python
Follow Dave as we program in MakeCode with Python.
Free Play Time
Tutorials
Have you tried out the tutorials? Some are made specifically for the micro:bit version 2, which we have.
Crafting
We have cardboard, craft sticks, and glue guns if anybody wants to do some of that type of thing.
Observations
The Programming in Python activity ran into a bit of a problem when a student wanted to access the compass heading, and Dave, eager to follow students’ interests, tried it out with the following code:
heading = input.compass_heading()
basic.show_number(heading)
This code worked fine in the simulators, but once on the micro:bit, it caused unexpected messages to appear, which Dave later discovered is a calibration sequence for the compass: You have to tilt the micro:bit to “fill the screen”.
Three students assembled a launching gate from the laser-cut pieces:
Others did tutorials and explored their own ideas.
2022-02-15
Computing in the News
High-speed drones are revolutionizing how we watch winter sports
New Design for Hot Wheels Gate
Group Activity: Programming a Time-Delayed Gate in Python
Here we’ll have a Hot Wheels track with three gates. The first will hold the car until the gate is opened. The others will open after a configurable delay. What’s the point of the other gates? We’re pretending that they only allow “friendly” cars to pass. They should open just in time for the car to pass.
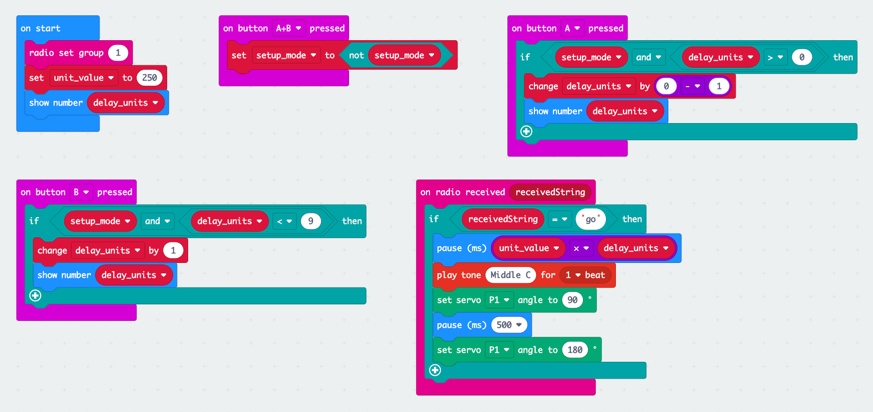
The program has two operating modes: normal mode and setup mode.
To switch between the modes, press A and B together. Once in
setup mode you can change the delay units value using the
A and B buttons. The units are 1/4 second.
This table shows the delay in seconds for each of
the ten delay units values.
| Delay Units | Seconds |
|---|---|
| 0 | 0 |
| 1 | 0.25 |
| 2 | 0.5 |
| 3 | 0.75 |
| 4 | 1 |
| 5 | 1.25 |
| 6 | 1.5 |
| 7 | 1.75 |
| 8 | 2 |
| 9 | 2.25 |
Setup
- Create a new project
- Expand
Code optionsand choose Python only
- Expand
- Install the Servo extension
- Use radio group 1
- Create variables
- setup_mode = False
- Pressing A and B together toggle setup mode
- delay_units = 0
- How many “units” to delay after receiving the “go” command before raising the gate. It starts at zero but can be changed within the range 0–9 using the A and B buttons when in setup mode
- unit_value = 250
- The number of milliseconds per delay unit
- setup_mode = False
- Show delay_units on the display
Event handlers
- A+B pressed
- toggle the setup_mode variable
- to toggle a boolean named b:
b = not b
- to toggle a boolean named b:
- toggle the setup_mode variable
- A pressed
- if in setup mode and delay_units > 0
- decrement delay_units
- Show delay_units on the display
- if in setup mode and delay_units > 0
- B pressed
- if in setup mode and delay_units < 9
- increment delay_units
- Show delay_units on the display
- if in setup mode and delay_units < 9
- Radio received string
- if the string is “go”
- pause for unit_value × delay_units milliseconds
- play a brief musical tone
- set servo angle to 90°
- pause for 1/2 second
- set servo angle to 180°
- if the string is “go”
Here is one solution:
radio.set_group(1)
setup_mode = False
delay_units = 0
unit_value = 250
basic.show_number(delay_units)

def on_button_pressed_ab():
    global setup_mode
    setup_mode = not setup_mode
input.on_button_pressed(Button.AB, on_button_pressed_ab)

def on_button_pressed_a():
    global delay_units
    if setup_mode and delay_units > 0:
        delay_units -= 1
        basic.show_number(delay_units)
input.on_button_pressed(Button.A, on_button_pressed_a)

def on_button_pressed_b():
    global delay_units
    if setup_mode and delay_units < 9:
        delay_units += 1
        basic.show_number(delay_units)
input.on_button_pressed(Button.B, on_button_pressed_b)

def on_received_string(receivedString):
    if receivedString == 'go':
        basic.pause(unit_value * delay_units)
        music.play_tone(Note.C, music.beat())
        servos.P1.set_angle(90)
        basic.pause(500)
        servos.P1.set_angle(180)
radio.on_received_string(on_received_string)
Code in Blocks
Curious what this project would look like if we had made it with blocks?
Observations
This was challenging. Nevertheless, several students got the code working right by the end. Others copied Dave’s solution above. It would have been helpful to show the working program at the beginning to help the students understand more clearly what they are building. The concept of a “setup mode” was confusing to some, and having different modes made the program more complex, without adding any immediate benefit.
2022-02-17
Computing in the News
Finishing The Gate Project
Here’s the latest code, with some new features, and with the setup mode removed.
Download the program to the micro:bit. Run it,
and use the A and B buttons to choose a delay units value. Let’s use all values from
0 to 9. Dave will send the new play command
and your micro:bits will play a tone. Then he’ll send
the go command and your micro:bit will
respond after the delay you’ve set up.
Free Play Time
Customize the gate program (with sound or other features), or make something new. Try a new tutorial?
2022-02-24
Computing in the News
Inside the Lab Where Intel Tries to Hack Its Own Chips
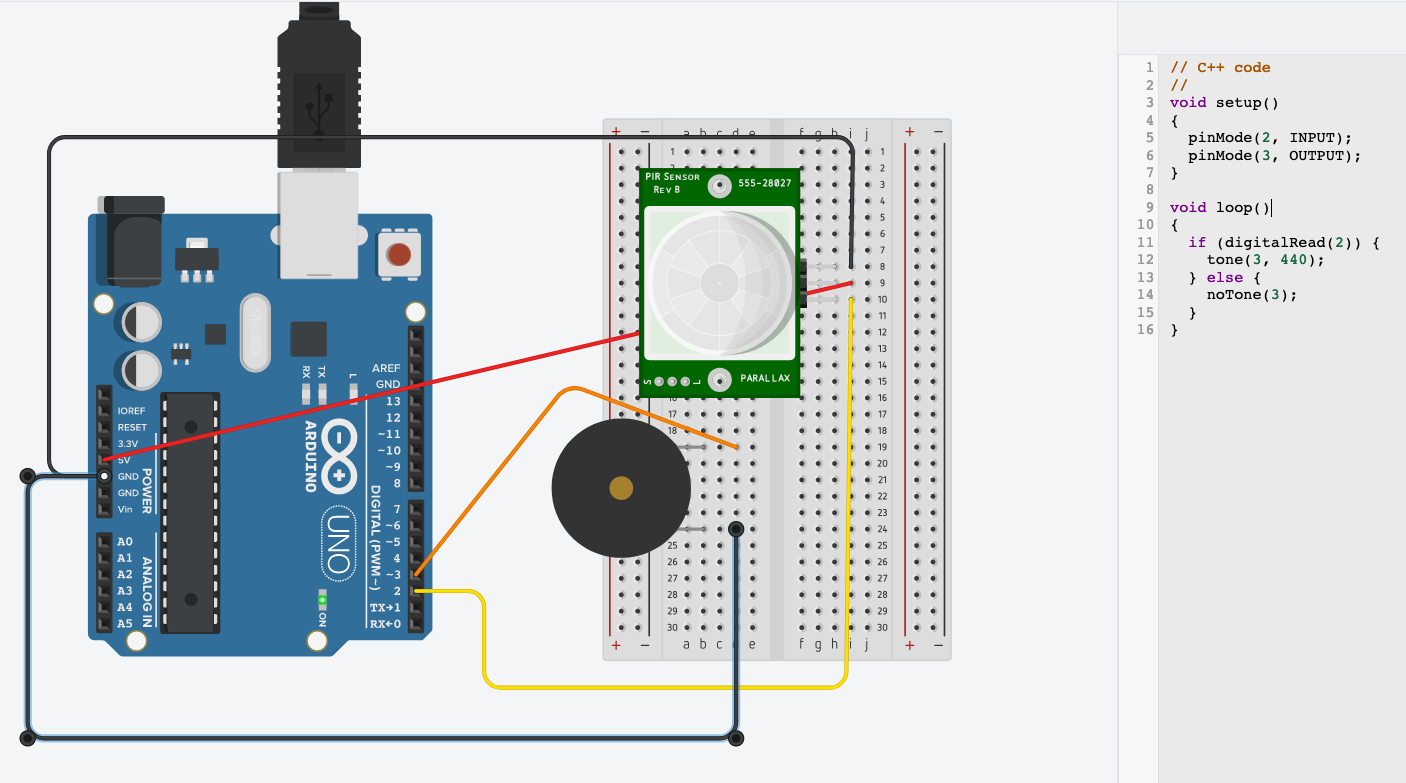
Arduino
Here’s a project Dave has been working on. It uses an Arduino. Arduino lacks some friendly features that Circuit Playground Express and micro:bit have, but it provides other features, such as supporting both 5 volts and 3.3 volts. Dave used it for this project because the ultrasonic range finder requires 5 volts. Unlike the other microcontrollers we’ve used, Arduino is usually programmed in the C++ language (which is very fast compared to Python, but much more difficult).
Code for the Fan Project
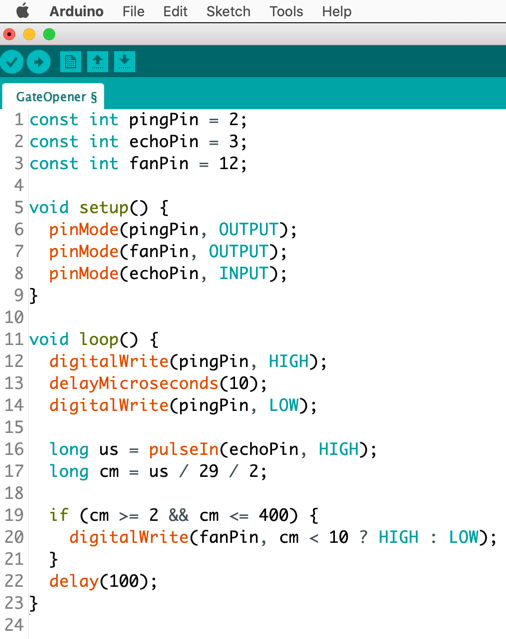
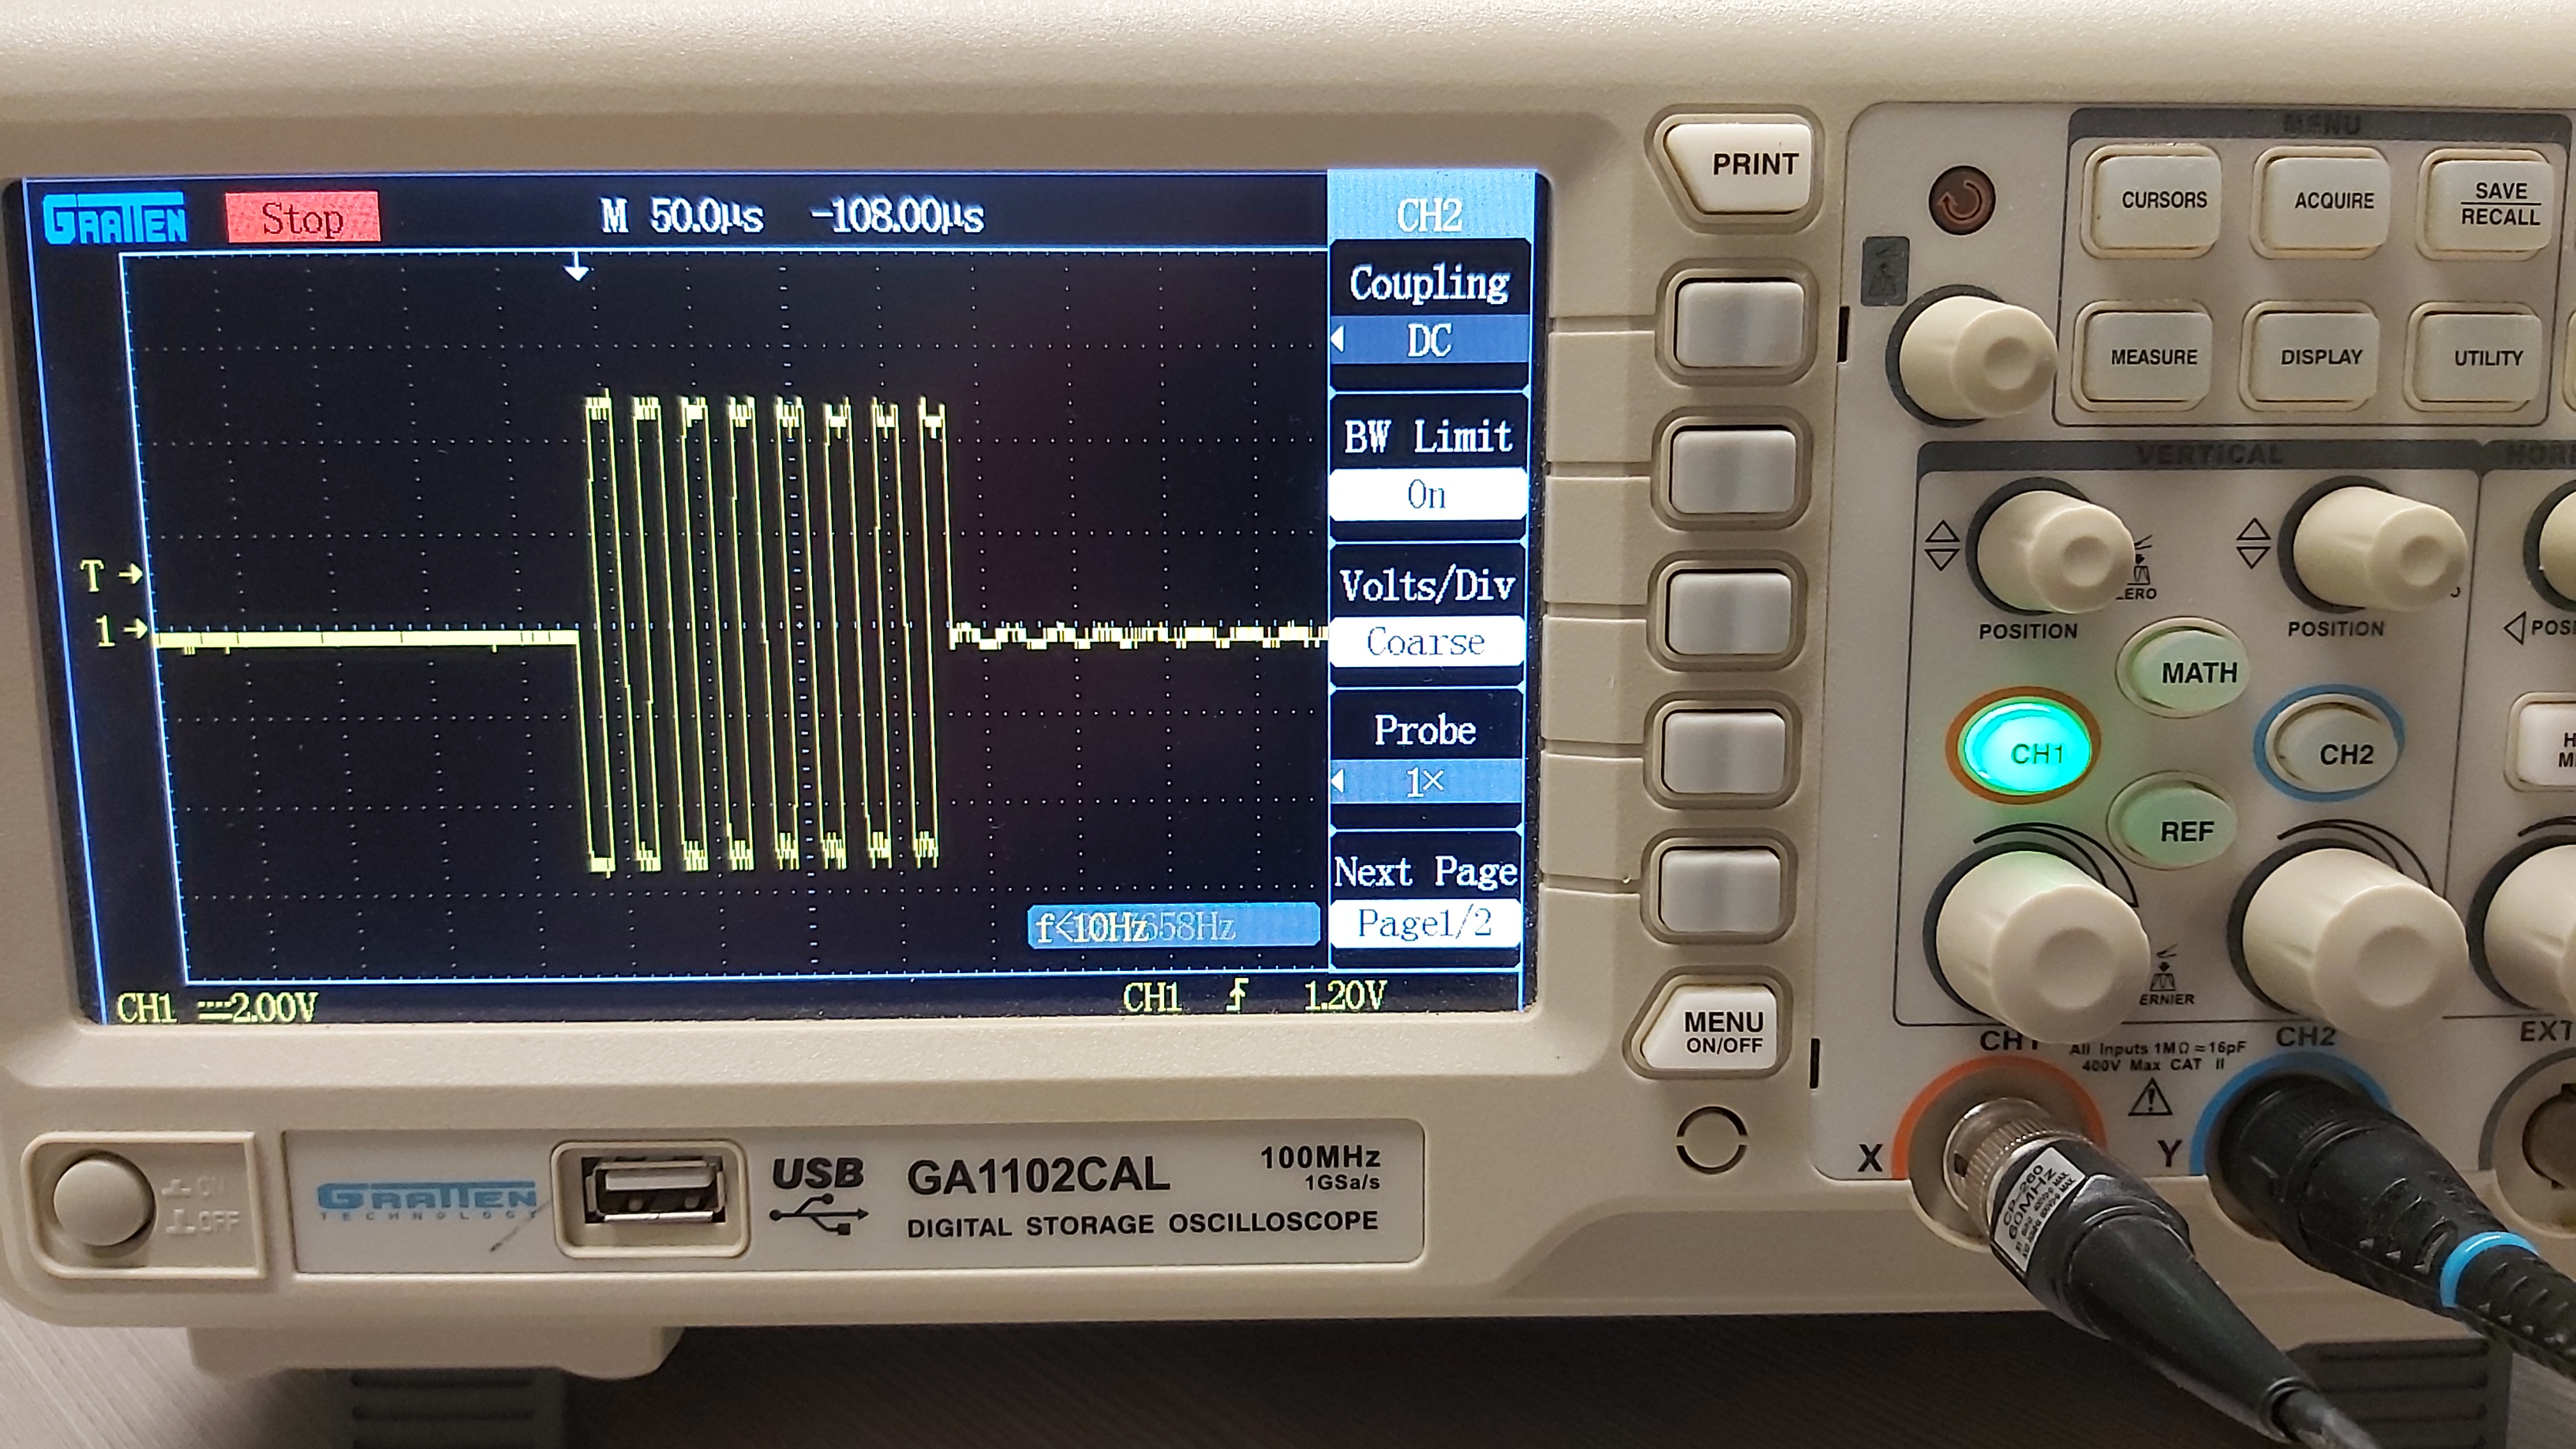
The 8 Cycles at 40khz from the Ultrasonic Range Finder
Electrical Circuits
TinkerCad Circuits
Go to TinkerCad, Start Tinkering, Create an Account (using a Google account is easy).
We’ll wire up this circuit together.
Next, we’ll wire up the circuit using real hardware.
Burglar Alarm
And now, a burglar alarm in the TinkerCad simulator:
2022-03-01
Computing in the News
3D-Printed Dog Treat Dispenser Outperforms Predecessors
Raspberry Pi
Example Raspberry Pi Application: Smart Thermostat
Final Project
Let’s make something to show all the students on Thursday, our last day.
2022-03-03
Final Project
Work on final project, and present.